Java
MICROSERVICES
Microservice architectures are the ‘new normal’. Building small, self-contained, ready to run applications can bring great flexibility and added resilience to your code.
Spring Boot’s many purpose-built features make it easy to build and run your microservices in production at scale.
1. MODULAR PROJECT STRUCTURE
Suggest to create modular project structure, where services classes are kept in service module, persistence classes are kept in persistence module, etc.
Creating modular code base scales better, and makes it easier to navigate for the developers.
Within the module, it is recommended to follow the following package structure:
src/main/java— Contains Java source code packages and classessrc/main/resources— Contains non-Java resources, such as property files and Spring configurationsrc/test/java— Contains test source code packages and classessrc/test/resources— Contains non-Java resources, such as property files and Spring configuration
Avoid using the default package. Make sure that everything (including the entry point) lives in a well-named package. This is to avoid surprises related to wiring and component scan.
2. PROJECT DEPENDENCY STANDARDS
- Do put version numbers of third party dependent libraries which are NOT in Spring Boot BOM within the
section in the pom file, which makes it easier to upgrade and test newer versions.
<properties>

        <java.version>11</java.version>

</properties>
DO include version numbers for all plugins.
DO NOT specify version numbers of the dependent libraries which are part of the Spring Boot bill of materials.
DO NOT have mixed versions of direct dependent libraries or transitive dependent libraries within the same project. For example, slf4j 1.5 and slf4j 1.6 do not work together, therefore we need to prohibit the project from building with mixed dependency versions. One way to be sure is to run mvn dependency:tree to identify conflicting versions of dependent libraries.
3. LOGGING RULES
Never use System.out
Never use System.err
We need to use AINQA QDMLogger
QdmLogger logger = new QdmLogger();

    logger.init(userid, applicationName, loggingDbName, loggingDbUrl, loggingCollectionName,eventCollectionName, loggingApiUrl);


    logger.error("Error Message");

    logger.trace("Trace Error");

    logger.debug("Debug Error");

    logger.info("info Error");

    logger.warn("Warning Message");

    logger.fatal("fatal message");
4. AUTO CONFIGURATION
Auto-configuration is the part of Spring Boot that makes our code simply work.
Auto-configuration attempts to automatically configure our Spring application based on the jar dependencies that we have added.
We need to opt-in to auto-configuration by adding the @EnableAutoConfiguration or @SpringBootApplication annotations to one of our Configuration classes.
It is generally recommended that we add one or the other annotation to our primary Configuration class only.
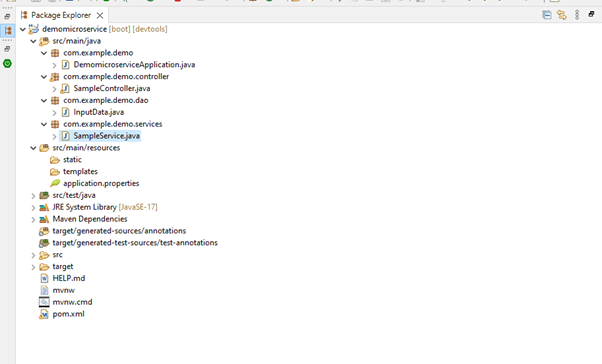
src folder contains the following:
src/main/java
com.example.demo package contains the Main Class which is the starting point of the application.
com.example.demo.controller package contains apis.
com.example.demo.services package contains the business logic implemented services that the controllers will be calling.
com.example.demo.dao package contains the pojo classes that the services will be using.
src/main/resources
- contains
application.propertiesfile where we can define the generic information that the application needs like database url, username, password, database name, connection pool size etc., We can change these properties based on the deployment environment.
- Definitely take advantage of Spring Boot’s auto-configuration instead of manually injecting beans or intercepting any requests.
5. KEEP CONTROLLERS SIMPLE AND CLEAN
The job of the Controllers is to coordinate and delegate, rather than to execute actual business logic. Key practices:
Controllers should be stateless. Controllers are by default singletons and giving them any state can cause massive issues.
Controllers should not execute business logic but rely on delegation.
Controllers should deal with the HTTP layer of the application. This should not be passed down to Services.
Controllers should be oriented around a use case or business capability.
Representational state transfer (REST) is a software architectural style that defines a set of constraints to be used for creating Web services.
Web services that conform to the REST architectural style, called RESTful Web services (or simply RESTful services).
RESTful services enable us to develop any kind of application involving all possible CRUD (create, retrieve, update, delete) operations.
We should utilize the different HTTP verbs which correspond to CRUD operations.
The primary or most-commonly-used HTTP methods are GET, POST, PUT and DELETE.
CORS – Cross Origin Resource Sharing, is a security check which happens when your browser requests a resource from a different domain to the one you are currently on via a script.
For example : if you have an application on domain1.com and are requesting microservice content from domain2.com, a CORS check will be made.
You can enable cross-origin resource sharing (CORS) from either in individual controllers or globally. The following topics describe how to do so:
Controller Method CORS Configuration
So that the RESTful web service will include CORS access control headers in its response, you have to add a @CrossOrigin annotation to the handler method, as the following listing
@CrossOrigin(origins = "*", allowedHeaders = "*")

@RestController
This @CrossOrigin annotation enables cross-origin resource sharing only for this specific method. By default, its allows all origins, all headers, and the HTTP methods specified in the @RequestMapping annotation.
Also, a maxAge of 30 minutes is used. You can customize this behavior by specifying the value of one of the following annotation attributes:
origins
methods
allowHeaders
exposedHeaders
allowCredentials
maxAge
Global CORS Configuration
In addition (or as an alternative) to fine-grained annotation-based configuration, you can define some global CORS configuration as well.
This is similar to using a Filter but can be declared within Spring MVC and combined with fine-grained @CrossOrigin configuration.
By default, all origins and GET, HEAD, and POST methods are allowed.
@SpringBootApplication

public class DemomicroserviceApplication {


public static void main(String[] args) {

     SpringApplication.run(DemomicroserviceApplication.class, args);

}


    public WebMvcConfigurer corsConfigurer() {

        return new WebMvcConfigurer() {

            @Override

            public void addCorsMappings(CorsRegistry registry) {

                registry.addMapping("*").allowedOrigins("*");

            }

        };

    }


}
- In performing these operations in RESTful services, there are guidelines or principles that suggest using a specific HTTP method on a specific type of call made to the server.
| HTTP Method | CRUD | Example | Description | Result |
|---|---|---|---|---|
| GET | Read | /users | List all users, pagination, sorting and filtering is used for big lists | 200 (OK) – successfully retieved. |
| /users/{id} | Get specific user by id | 200 (OK) 404 (Not Found) – id not found or invalid | ||
| POST | Create | /users | Create new user | 201 (Created) - Successfully created 409 (Conflict) - indicated that resource already exist. |
| /users/{id} | Return 405 (Method not Allowed), avoid using POST on single resource | |||
| PUT | Update / Replace | /users | Return 405 (Method not Allowed), unless you want to replace every resource in the entire collection of resource – use with caution | |
| /users/{id} | Update a user | 200 (OK) or 204 (No Content) – indicates successful completion of the request. 201 (Created) if the new resource is created and creating new resource is allowed. 404 (Not Found) – if Id not found or invalid and creating new resource is not allowed. | ||
| DELETE | Delete | /users | Return 405 (Method not Allowed), unless you want to delete the whole collection – use with caution | |
| /users/{id} | Delete a user | 200 (OK) or 204 (No Content) or 202 (Accepted) or 404 (Not Found) – if Id not found or Invalid. |
6. FOCUS SERVICES ON BUSINESS LOGIC
Build our services around business capabilities/domains/use-cases.
Applications with Services called something like AccountService, UserService are much easier to deal with than those with DatabaseService, ValidationService etc.
Usually there is a 1-to-1 mapping between Controllers and Services.
7. CREATING SPRING BOOT SERVICES IN ECLIPSE AND MAVEN
- Naming a Project - We give a name to the project.
- Declaring Dependencies - Dependencies are frameworks that you need in order to develop your project
- Creating Spring Boot Projects with Eclipse and Maven - There are three options to create Spring Boot Projects with Eclipse and Maven:
a. Bootstrap Spring Boot Project with Spring Initializer. We will use Spring Web MVC as our web framework.
b. Use STS or STS Eclipse Plugin to Create Spring Boot Maven Project. Download the complete installation of STS or you can install the STS Eclipse plugin.
c. Manually Create a Maven Spring Boot Project. Create the project manually.
A. SOFTWARES REQUIRED
| Software | Version | link |
|---|---|---|
| Java | Jdk 11.0.15.1 | https://www.oracle.com/in/java/technologies/javase/jdk11-archive-downloads.html#license-lightbox |
| Maven | Maven 3.8.6 | https://maven.apache.org/download.cgi |
| STS – IDE | STS 3.9.10 | https://www.javatpoint.com/spring-boot-download-and-install-sts-ide |
B. NAMING A PROJECT
- How can other projects use our project? By using our project
groupIdandartifactId. We give a name to the project in the pom.xml, as shown below:
<groupId>com.ainqa.qdm</groupId>

<artifactId>service-testing-tool</artifactId>
C. DECLARING DEPENDENCIES
- Dependencies are frameworks that you need in order to develop your project. In the example below, we add two dependencies:
<dependencies>

   <dependency>

        <groupId>org.springframework.boot</groupId>

        <artifactId>spring-boot-starter-web</artifactId>

    </dependency>


    <dependency>

        <groupId>org.springframework.boot</groupId>

        <artifactId>spring-boot-starter-test</artifactId>

        <scope>test</scope>

    </dependency>

</dependencies>
D. MAVEN BUILD LIFECYCLE
When we run
mvn clean install, we are executing the complete Maven build lifecycle. This lifecycle is a sequence of the following steps:o Validate
o Compile
o Test
o Package
o Integration Test
o Verify
o Install
o DeployThe predefined folder structure looks like this:
o   Source codeSource code

    ${basedir}/src/main/java

    ${basedir}/src/main/resources

o   Test code
D. HOW DOES MAVEN WORK?
A Maven repository contains all the JARs indexed by artifact ID and group ID.
Once we add a dependency to our pom.xml, Maven asks the Maven repository for the JAR dependencies, giving group ID and the artifact ID as the input.
The JAR dependencies are stored on your machine in a folder called maven local repository. All our projects refer to the JARs from here.
Note: A local repository is a temp folder on your machine where Maven stores the JAR and dependency files that are downloaded from the Maven repository.
E. IMPORTANT MAVEN COMMANDS
| Command | Description |
|---|---|
| mvn -version | Finds the Maven version |
| mvn compile | Compiles source files |
| mvn test-compile | Compiles test files as well as source files |
| mvn clean | Deletes target directory |
| mvn test | Runs unit tests |
| mvn package | Creates a JAR for the project |
| help:effective-settings | Debugs Maven settings |
| help:effective-pom | Look at the complete pom after all inheritances from parent poms are resolved |
| dependency:tree | Looks at all the dependencies and transitive dependencies |
| dependency:sources | Downloads source code for all dependencies |
| -debug | Debug flag; can be used with all the above commands |
7. CREATING SPRING BOOT SERVICES IN ECLIPSE AND MAVEN
With the Spring tool suite, you can directly create a Spring Boot project from Eclipse.
You should either download the complete installation of STS or you can install the STS Eclipse plugin.
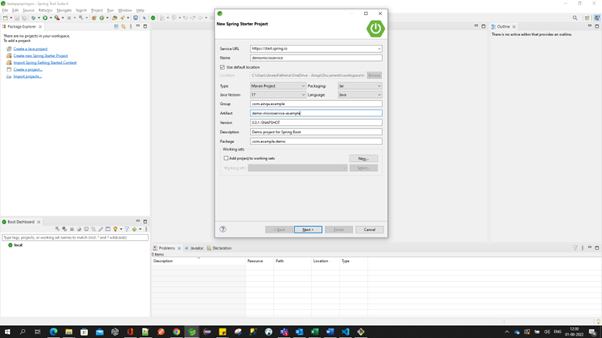
In Eclipse/STS, start with File > New > Spring Starter Project. In the next screen, you can choose the following for your project:
Group ID
o   uniquely identifies your project across all projects.

o   A group ID should follow Java's package name rules.

o   This means it starts with a reversed domain name you control.
For example : <groupId>com.ainqa.qdm</groupId>
Artifact ID
o  It is the name of the jar without version.

o  If you created it, then you can choose whatever name you want with lowercase letters and no strange symbols.

o  If it's a third party jar, you have to take the name of the jar as it's distributed.
Example : <artifactId>service-testing-tool</artifactId>
Root package
Version
o version if you distribute it, then you can choose any typical version with numbers and dots (1.0, 1.1, 1.0.1, ...).
o Don't use dates as they are usually associated with SNAPSHOT (nightly) builds.
o If it's a third party artifact, you have to use their version number whatever it is, and as strange as it can look.
Example : <version>0.0.1</version>
Description
Java version
Language
Packaging
STEP 1:
STEP 2:
- You can choose the dependencies that you want to add to your Spring Boot project.
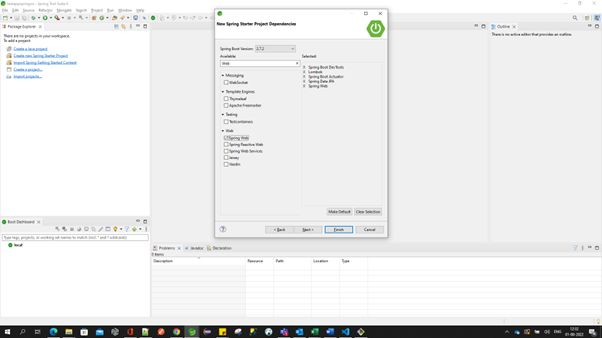
- Once you click Finish, Maven will take some time to download all the dependencies and initialize the project.
- Now your Spring project is ready!
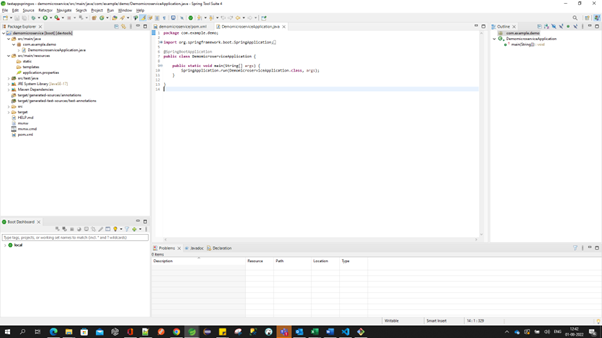
STEP 3:
- Create a Spring Boot application class that will be the launching point of the web application.
- /demomicroservice/src/main/java/com/example/demo/DemomicroserviceApplication.java
package com.example.demo;

import org.springframework.boot.SpringApplication;
import org.springframework.boot.autoconfigure.SpringBootApplication;

@SpringBootApplication
public class DemomicroserviceApplication {

    public static void main(String[] args) {
        SpringApplication.run(DemomicroserviceApplication.class, args);
    }

}
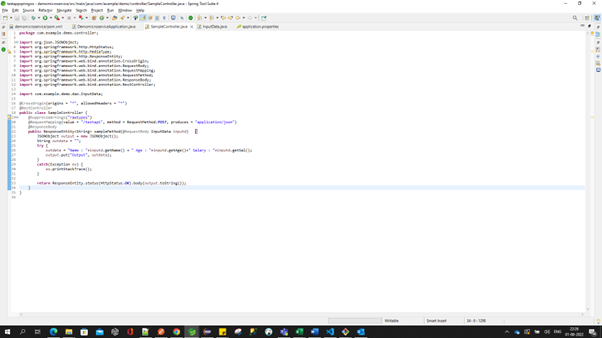
STEP 4 : Creating a sample Controller
@RestControllerindicates that the data returned by each method will be written straight into the response body instead of rendering a template- We have routes for each operation (
@GetMapping, @PostMapping, @PutMapping and @DeleteMapping, corresponding to HTTP GET, POST, PUT, and DELETE calls). (NOTE: It’s useful to read each method and understand what they do.) @ResponseBodysignals that this advice is rendered straight into the response body
package com.example.demo.controller;

import org.json.JSONObject;
import org.springframework.http.HttpStatus;

import org.springframework.http.ResponseEntity;
import org.springframework.web.bind.annotation.CrossOrigin;
import org.springframework.web.bind.annotation.RequestBody;
import org.springframework.web.bind.annotation.RequestMapping;
import org.springframework.web.bind.annotation.RequestMethod;
import org.springframework.web.bind.annotation.ResponseBody;
import org.springframework.web.bind.annotation.RestController;

import com.example.demo.dao.InputData;

@CrossOrigin(origins = "*", allowedHeaders = "*")
@RestController
public class SampleController {
    @SuppressWarnings("rawtypes")
    @RequestMapping(value = "/testapi", method = RequestMethod.POST, produces = "application/json")
    @ResponseBody
    public ResponseEntity<String> sampleMethod(@RequestBody InputData inputd)   {
        JSONObject output = new JSONObject();
        String outdata = "";
        try {
            outdata = "Name : "+inputd.getName() + " Age : "+inputd.getAge()+" Salary : "+inputd.getSal();
            output.put("Output", outdata);
        }
        catch(Exception ex) {
            ex.printStackTrace();
        }

        return ResponseEntity.status(HttpStatus.OK).body(output.toString());
    }
}
STEP 4 : TESTING IN POSTMAN
