IDM
Integrating IDM with React App
Basic Configuration:
React package configuration should be:
{
"react": "17.0.2",

"react-dom": "17.0.2",

"react-scripts": "4.0.3",
}
Material Ui package Configuration:
{
"@material-ui/core": "4.11.3",

"@material-ui/icons": "4.11.2",

"@material-ui/lab": "4.0.0-alpha.61",

"@material-ui/pickers": "3.2.10",
}
Step1:
Installation
For Login Screen Componet:
npm install atp-authentication-v2@latest
For User Management Component
npm install atp-authorization-v2@latest
Step 2:
Create Project Realm
Create Project Realm in key cloak from post man.
Follow below steps to achieve.
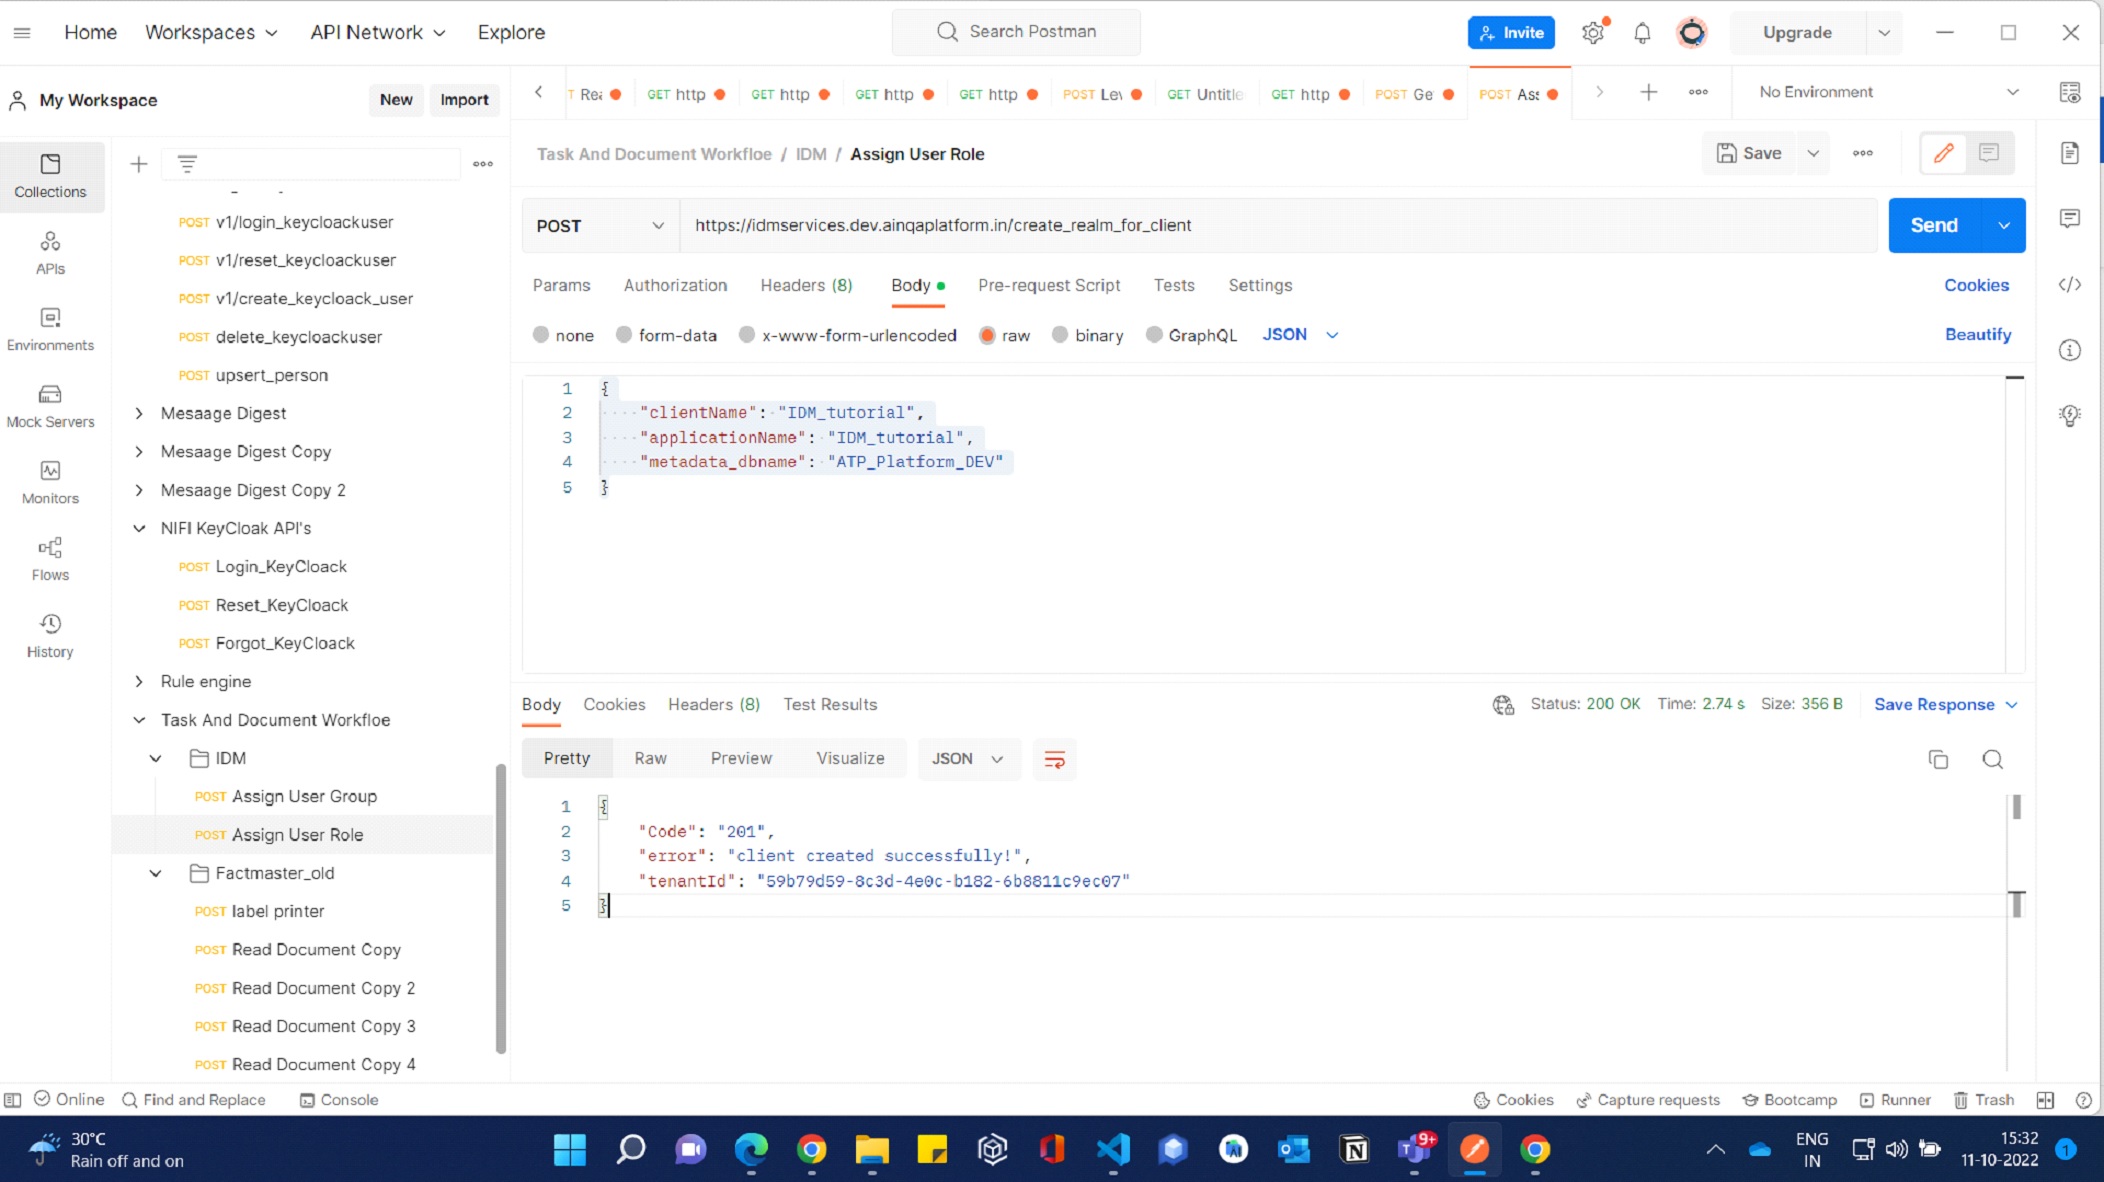
API URL: https://idmservices.dev.ainqaplatform.in/create_realm_for_client
Payload:
{

    "clientName": "idmpackage",

    "applicationName": "idmpackage",

    "metadata_dbname": "ATP_Platform_DEV"

}
Response:
{

    "Code": "201",

    "error": "client created successfully!",

    "tenantId": "0de8d38f-44e7-401a-923f-b9654b731610"

}
Note: Get the Tenant id from the response and config in the projects env file.
Step 3:
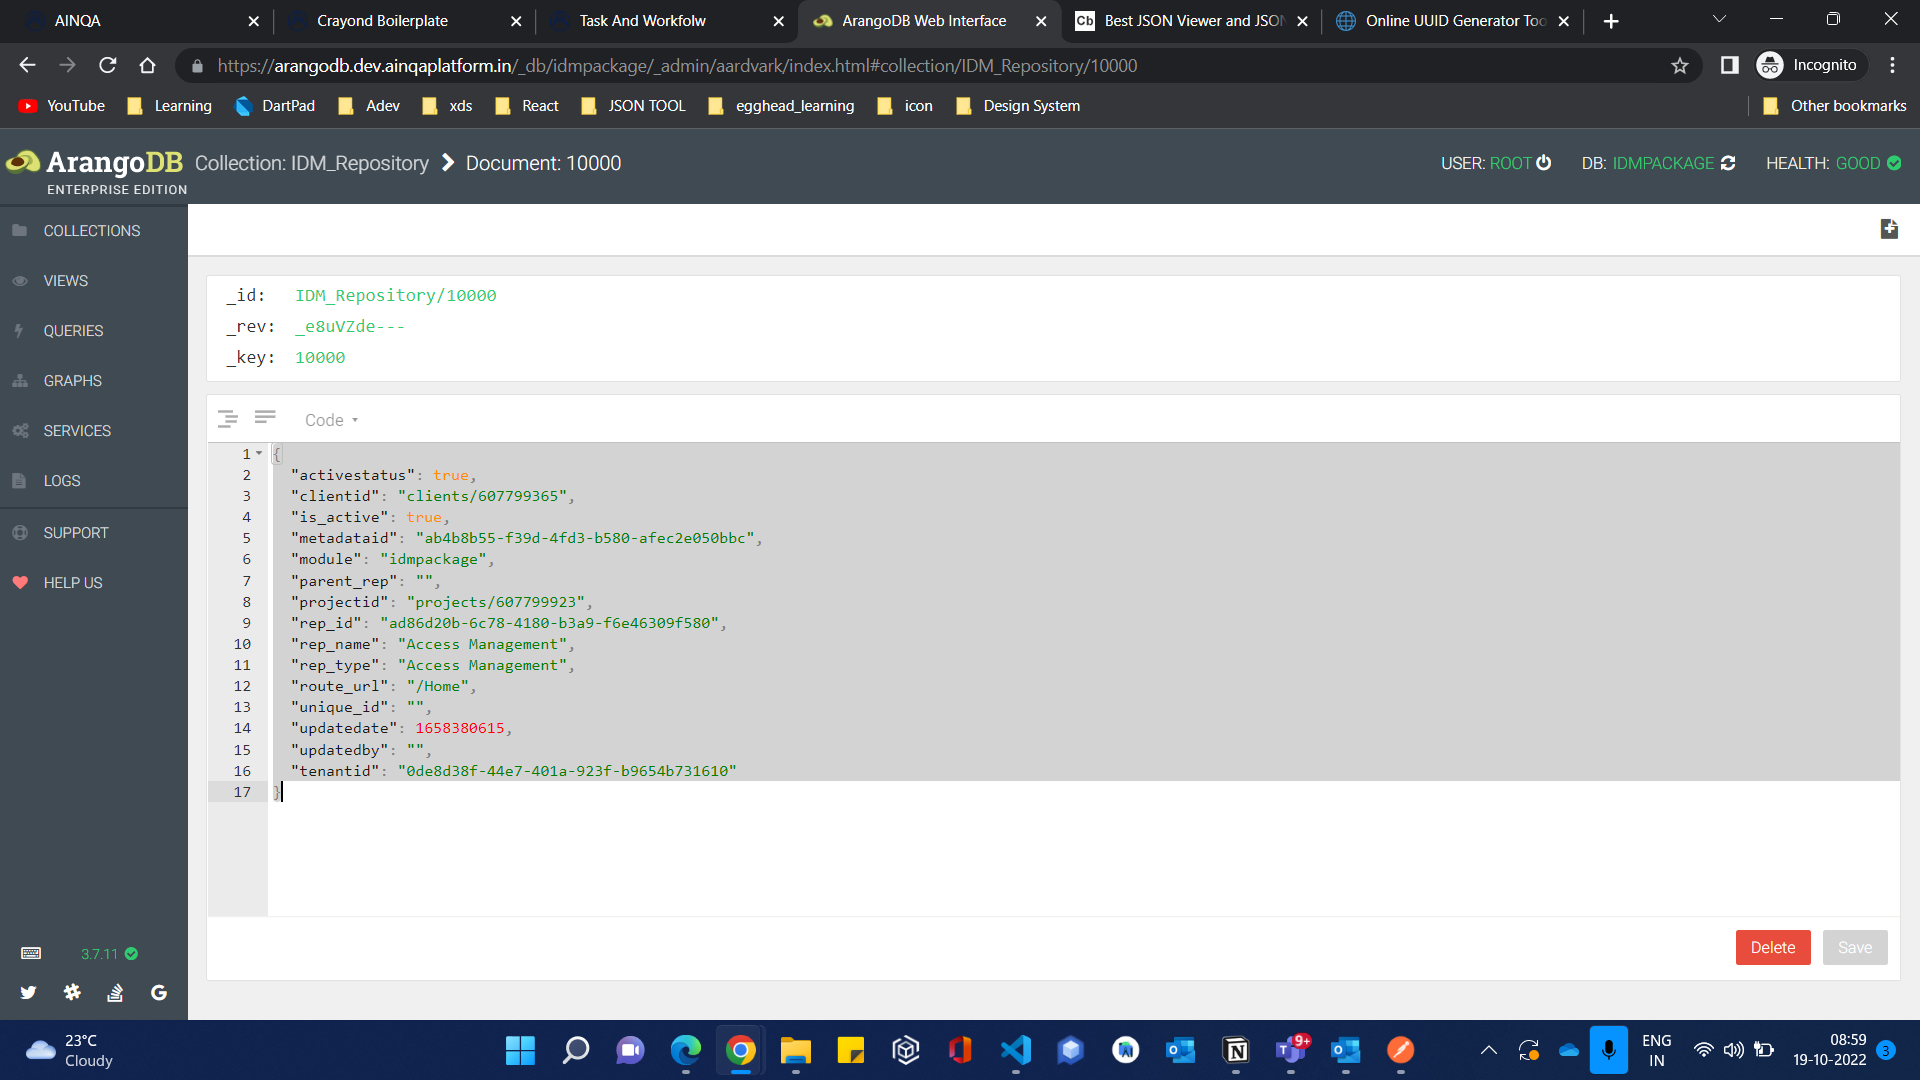
Create a base respositry for your project in IDM Repositry Collection.
sample
Create Super admin or Admin and it’s user Credentials:
API URL: https://idmservices.dev.ainqaplatform.in/createroleforidmrepository
Header:
"tenantId": "59b79d59-8c3d-4e0c-b182-6b8811c9ec07"
Payload: "idmrepo" will be the added base repositories _id
{
    "dbName": "idmpackage",
    "rolename": "Super Admin",
    "clientid": "clients/607799365",
    "projectid": "projects/607799923",
    "metadataid": "2f86450e-4035-463c-a0f4-f84709fd85a2",
    "metadata_dbname": "ATP_Platform_DEV",
    "idmrepo": [
        "IDM_Repository/10000"
    ],
    "personname": "Admin",
    "email": "superAdmin@ainqa.com",
    "update": "false"
}
Response:
{

    "Code": 201,

    "Result": "Person Added/Updated Successfully!",

    "permissionrolemapid": "IDM_PermissionRoleMapping/10002"

}
USER CREDENTIALS WILL BE :
User id: admin@gmail.com
DefaultPassword:adminpassword
Step 4:
Env configuration for IAM
DEFAULT ENV CONFIG For IDM Packages
#DEFAULT ENV CONFIG For IDM Packages
#Project DB name
REACT_APP_DB=idmpackage
#project metadata db name
REACT_APP_METADATA_DB_NAME="ATP_Platform_DEV"
#entityDesigner metadata id
REACT_APP_METADATAID=2f86450e-4035-463c-a0f4-f84709fd85a2
REACT_APP_API_ENDPOINT=https://arangodbservice.dev.ainqaplatform.in/api
REACT_APP_BASE_URL_PROTOCAL=https
REACT_APP_BASE_URL_HOST=arangodbservice.dev.ainqaplatform.in
REACT_APP_BASE_URL_PORT=443
REACT_APP_BASE_URL=https://arangodbservice.dev.ainqaplatform.in
REACT_APP_TOKEN_URL = https://idmservices.dev.ainqaplatform.in
REACT_APP_IDM_DB="IDMService"
REACT_APP_IDM_URL=idmservices.dev.ainqaplatform.in
REACT_APP_ARANGO_URL_READ_QDMQUERIES=https://arangodbservice.dev.ainqaplatform.in/api/read_qdmqueries
#clients _id
REACT_APP_CLIENT_REPO_ID=clients/607799365
#projects _id
REACT_APP_PROJECT_REPO_ID=projects/607799923
#IDM tool metadata id
REACT_APP_IDM_METADATA_ID=ab4b8b55-f39d-4fd3-b580-afec2e050bbc
#Client realms tenant id
REACT_APP_tenentID=0de8d38f-44e7-401a-923f-b9654b731610
Step 4:
How to use or implement atp-authentication:
By importing Authentication component from atp-authentication package.
In this example below I have integrated it with a login page.
App.js
import React from "react";
import { Authentication } from "atp-authentication-v2";
import "react-toastify/dist/ReactToastify.css";

const Login = () => {
  return (
    <>
      <Authentication
        redirectUrl={{ componentpath: Routes.dashboard }}
        showSignUp={true}
        showReset={true}
        logo={"/images/icons/72x72.png"}
      />
    </>
  );
};

export default Login;
Default Props:
RedirectUrl as route pathe url ->Base URL of react app which page should user navigate to after login in successfully.
showSignUp as boolean - show and hide signup button in login screen.
showReset as boolean - show and hide Reset button in login screen.
logo – Represent your app/project logo.
theme – Component will Inherit your App theme.
If you run the App, you will Get login UI by default;
If you have configured all required Api's in the env file. Now we can access the login page by using user credentials. It will authorize if you have access otherwise it will throw a validated error message in the top right of the login screen.
If You have a proper user credential for logging in it will authenticate and navigate to props value of redirect URL(eg:“/dashboard”) else in absence of redirect URL is it will navigate by default to “/Home” page.
By default, while logging in it will store some data in local storage for atp-authorization package configuration and it will base encoded.
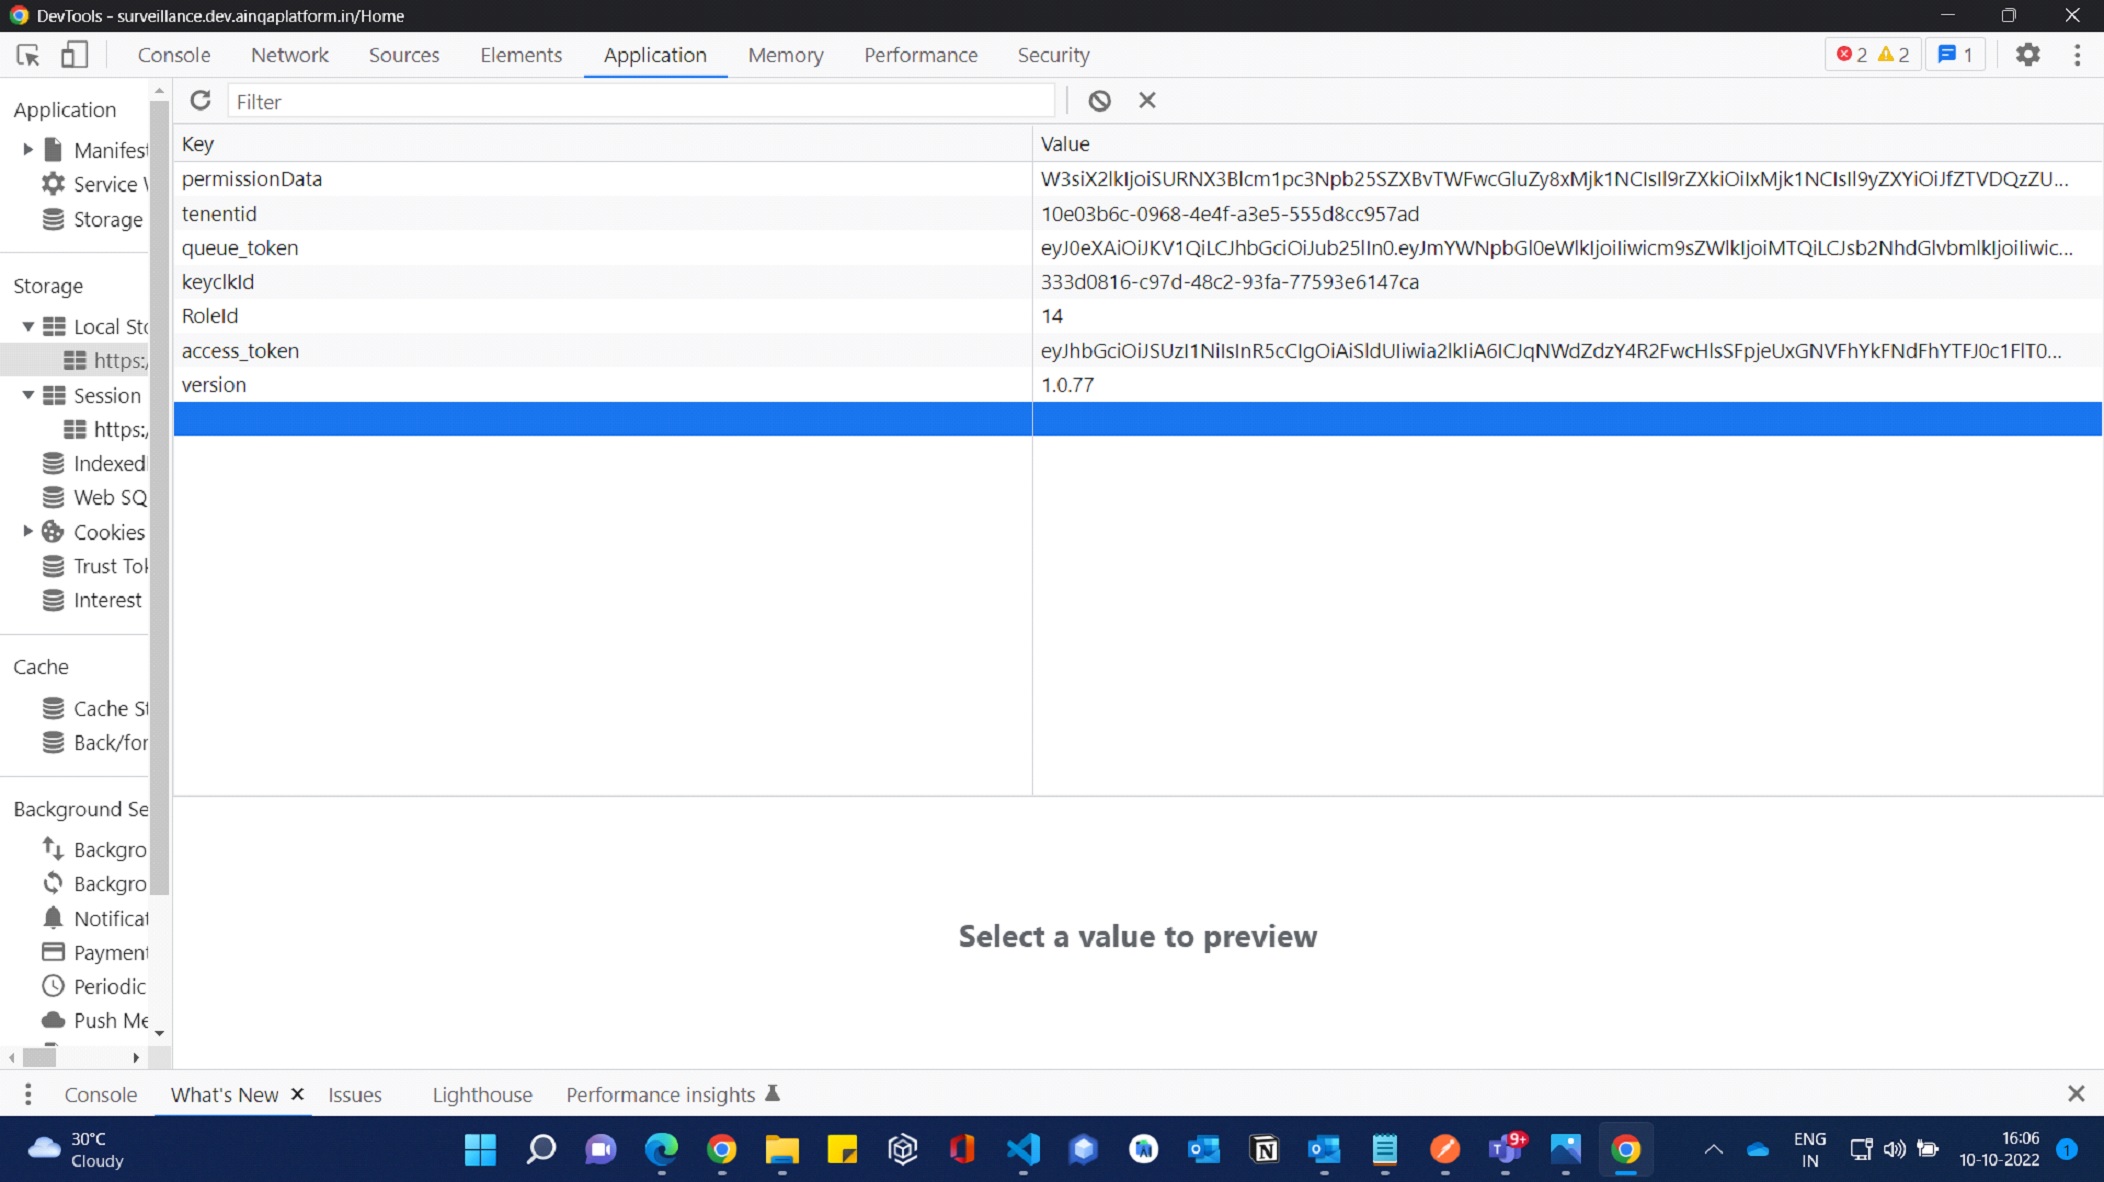
access_token : key cloak authorization token you will get while logging in.
keyclkId: Unique user id of user from key cloak.
tenantId: Unique user ID from IDM service.
RoleId : It will refer to role id of the user who logged in.
PermissionData: It will have the list of permissions to the user who logged in. For Required Purpose
queue_token: for listing queue in task & document and task viewer.
Step 5:
how to integrate atp-authorization.
By importing Authorization component from atp-authorization package.
In this example below I have integrated it with a login page.
Authentication sample
import React from "react";
import { Authorization } from "atp-authorization-v2";
import "react-toastify/dist/ReactToastify.css";

const AuthorizationManagement = () => {
  return (
    <div>
      <Authorization />
    </div>
  );
};

export default AuthorizationManagement;
Default Props:
theme – Component will Inherit your App theme.
Configuration:
If env file and local storage data are configured correctly. We will get a four Tab UI screen by default Repository will be selected in configured route path.
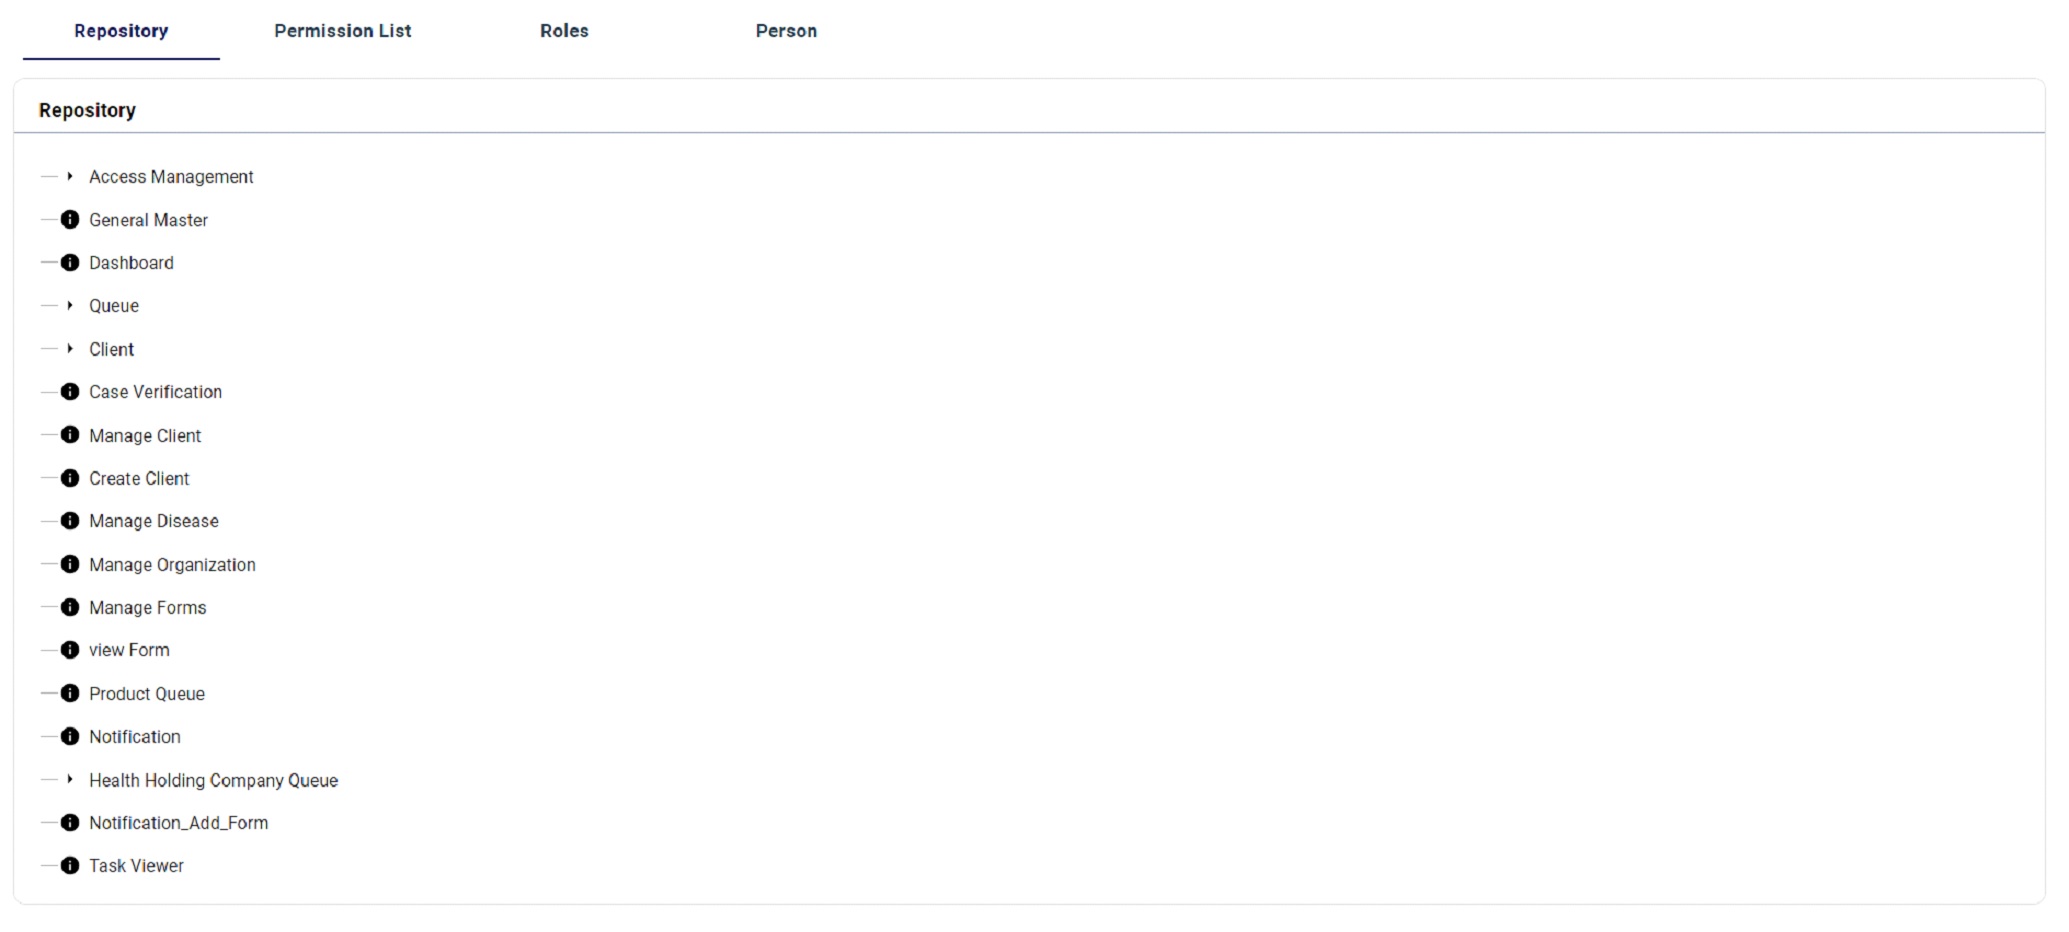
REPOSITORY:
This REPOSITORY Tab will list out all the repositories against your project.
Manuel Data Feeding for creating IDM Repository for UI Routing pages.
IDM Repositry Data Feeding Click here
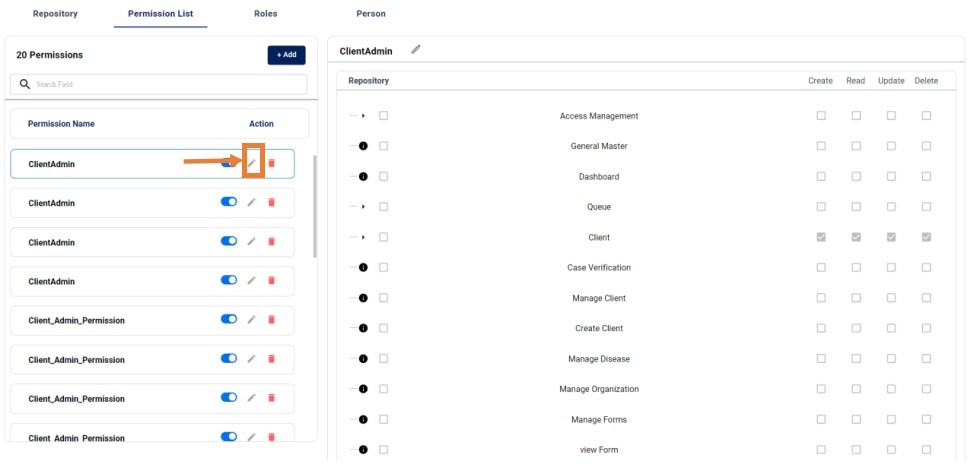
PERMISSION LIST:
In the PERMISSION LIST Tab, we will get list of all the Permissions.
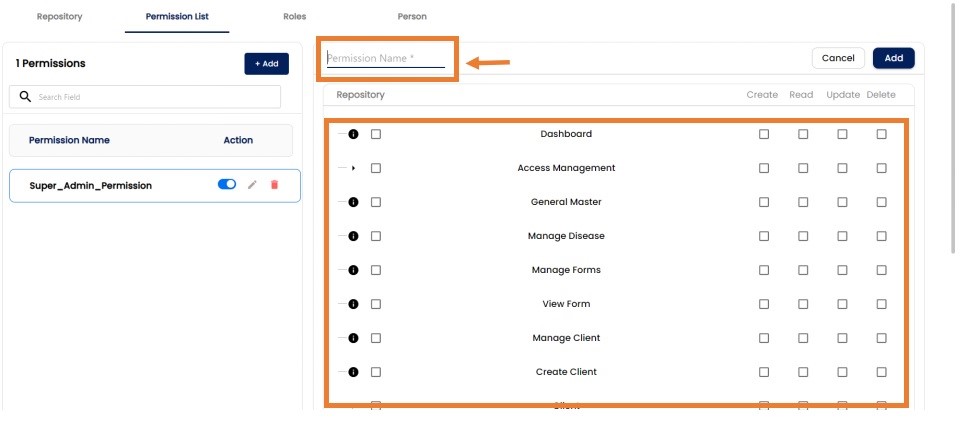
While configuration a new permission we can configure the required repositories create, Read, Update and Delete access to that permission.
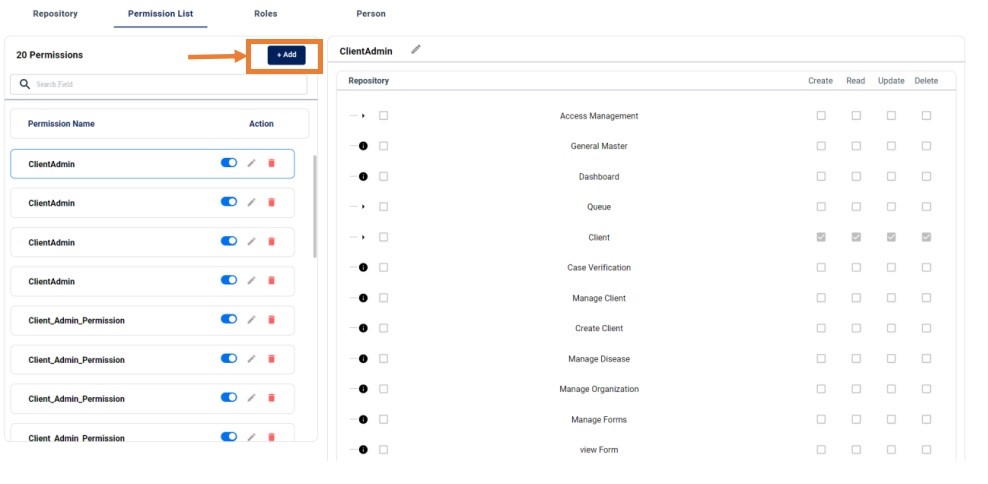
After clicking add new button in the premission we can add new persmission and config the repository to that repository.
Permission Edit:
ROLES:
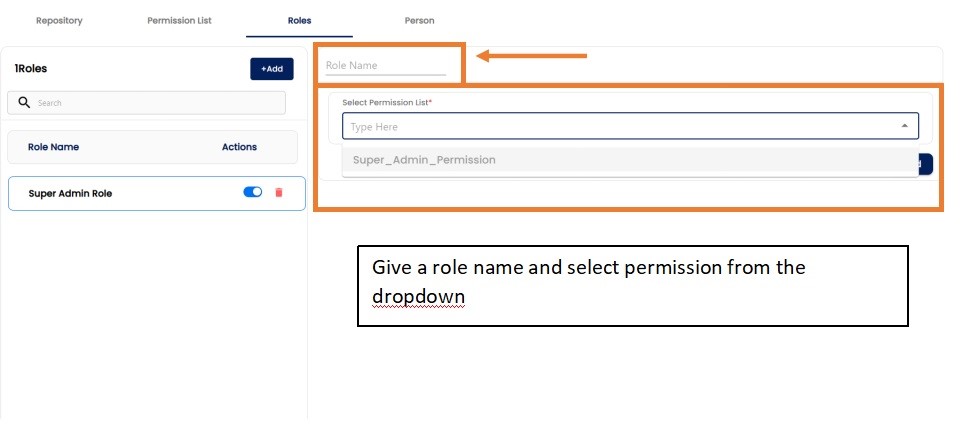
In the ROLES Tab you will list out all roles that are created. While creating a new role we have to map those roles to the creating user.
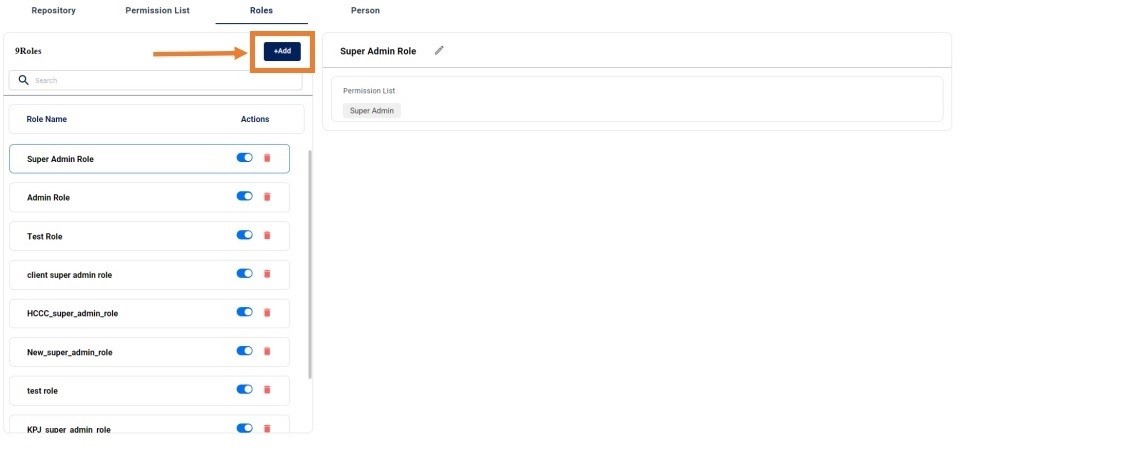
After Clicking add new button you will get a from to add role details.
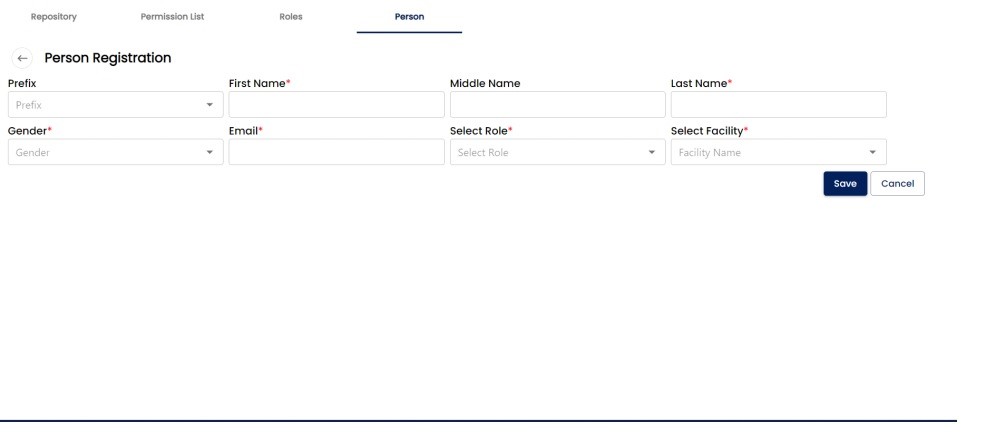
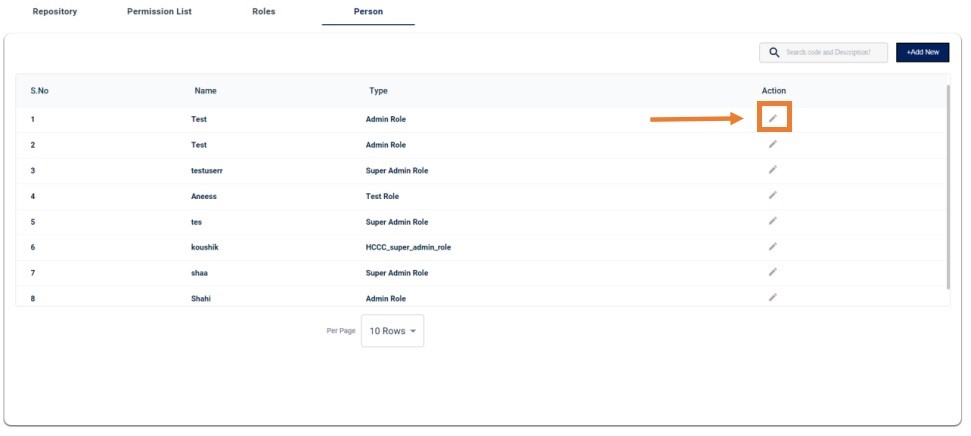
PERSON:
In the Person Tab, you will get the list of user/person. While creating a new user/person by clicking the add new button on top-right of the tab. We will get a user creation form. Where we can map different role to each user/person.
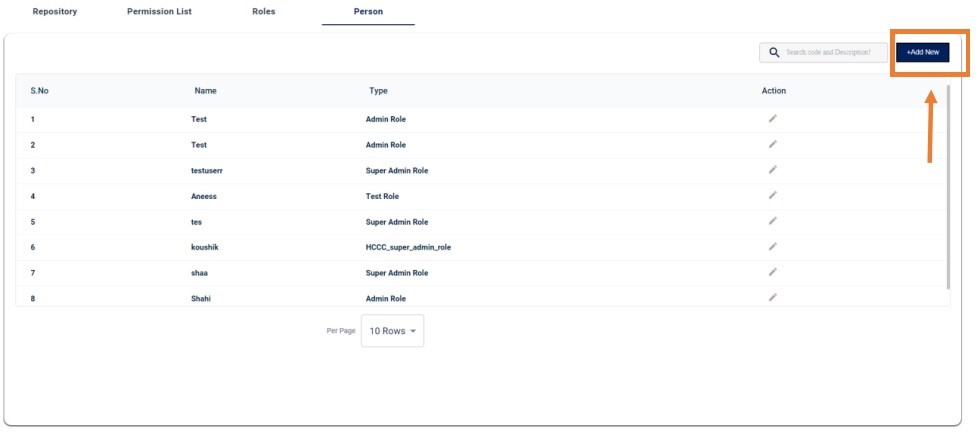
USER/PERSON CREATION FORM:
UPDATE/EDIT PERSON:
CHECK WITH IDM PACKAGE:
Installation
npm i atp-casbin-js
This package is used for rendring internal components based on user access that configured in the permission.
Sample Code
import { checkWithIdm } from "atp-casbin-js";

let hasAccessCheck = await checkWithIdm(
      _roledata,//Permission Data
      roleid,//user role id
      rep_name,//Repositories Name
      "read"//access
    );
By default, checkWithIdm function will return a boolean value based on given permission parameters.