Report Configuration and viewer
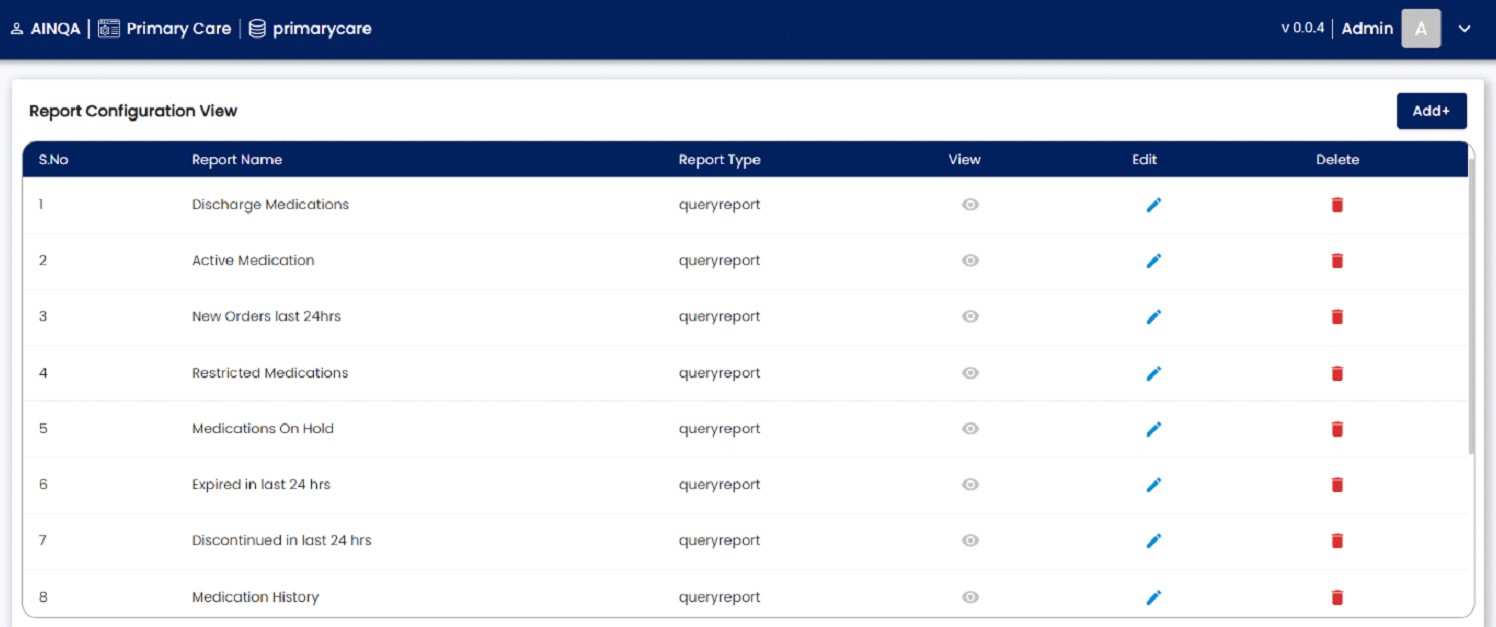
HOME PAGE
This screen will allow the user to view the existing report for a present project.
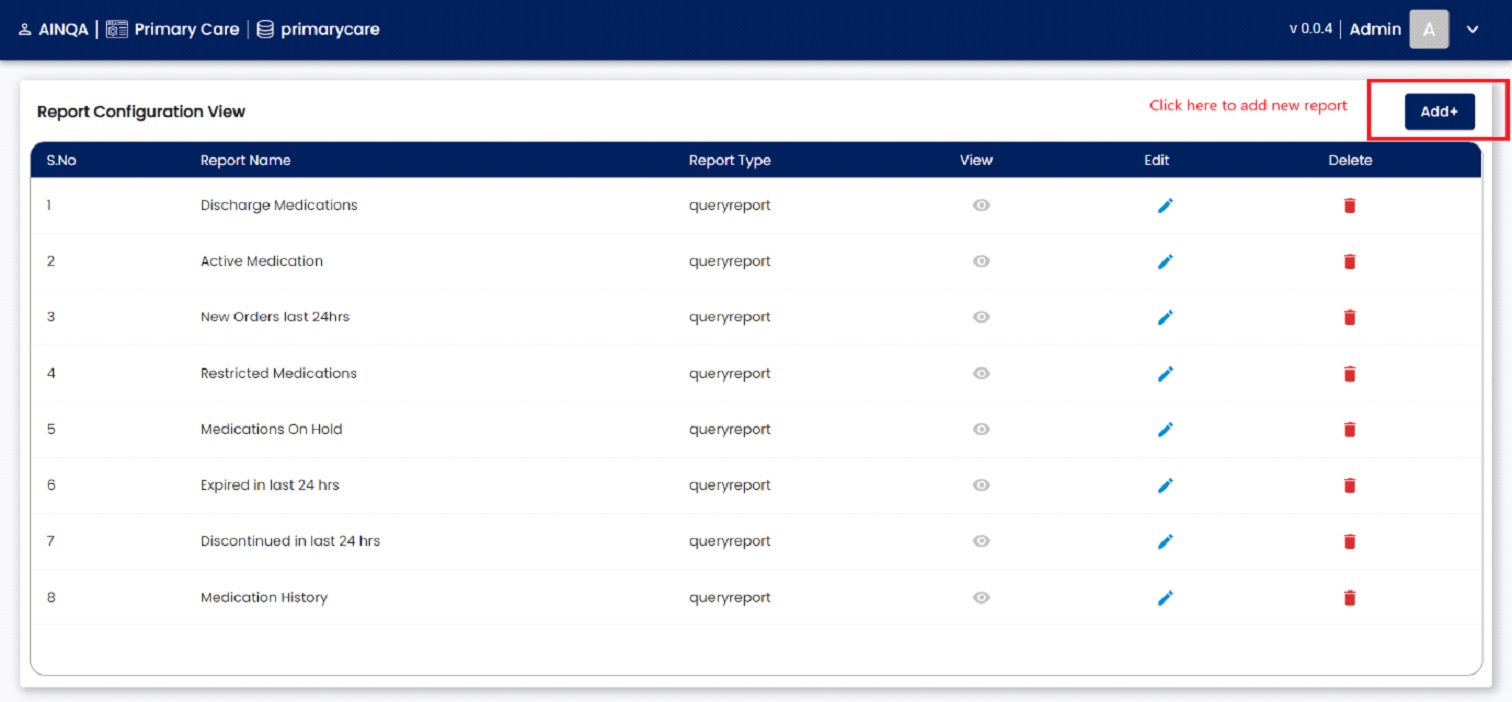
CREATE REPORT
Allows user to create new report by clicking the Add button on the top right on the screen 2.
REPORT DETAILS
When user clicks on the Add button this below Screen 3 will be presented to the user to create report.
Report creation includes the following fields:
Report ID – Auto generated field.
Report Name – required fields, will be text box which allows user to enter the name of the report.
Report Type – required fields, will be a drop down where user will be selecting their report type.
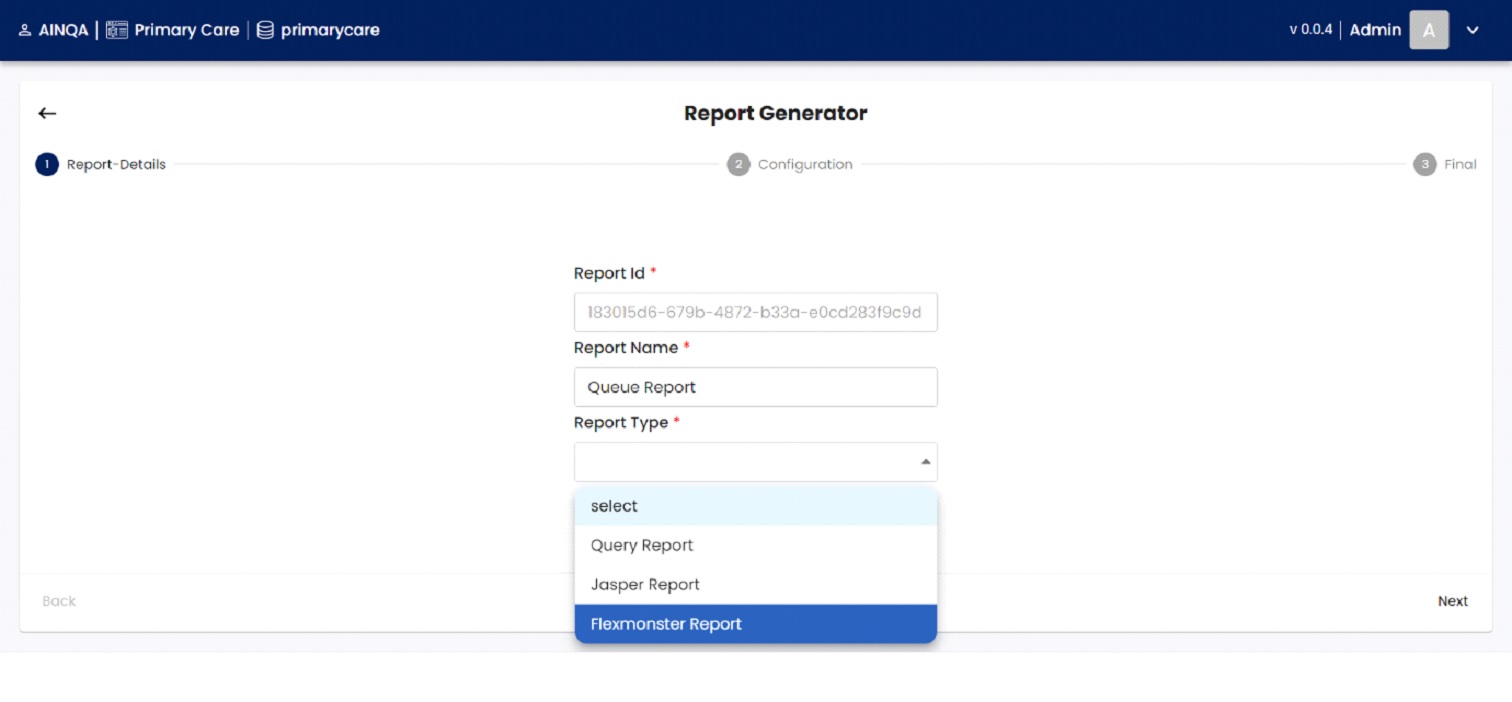
After completing the entries and selection and then click next button on the bottom right on the Screen 4 for report configuration

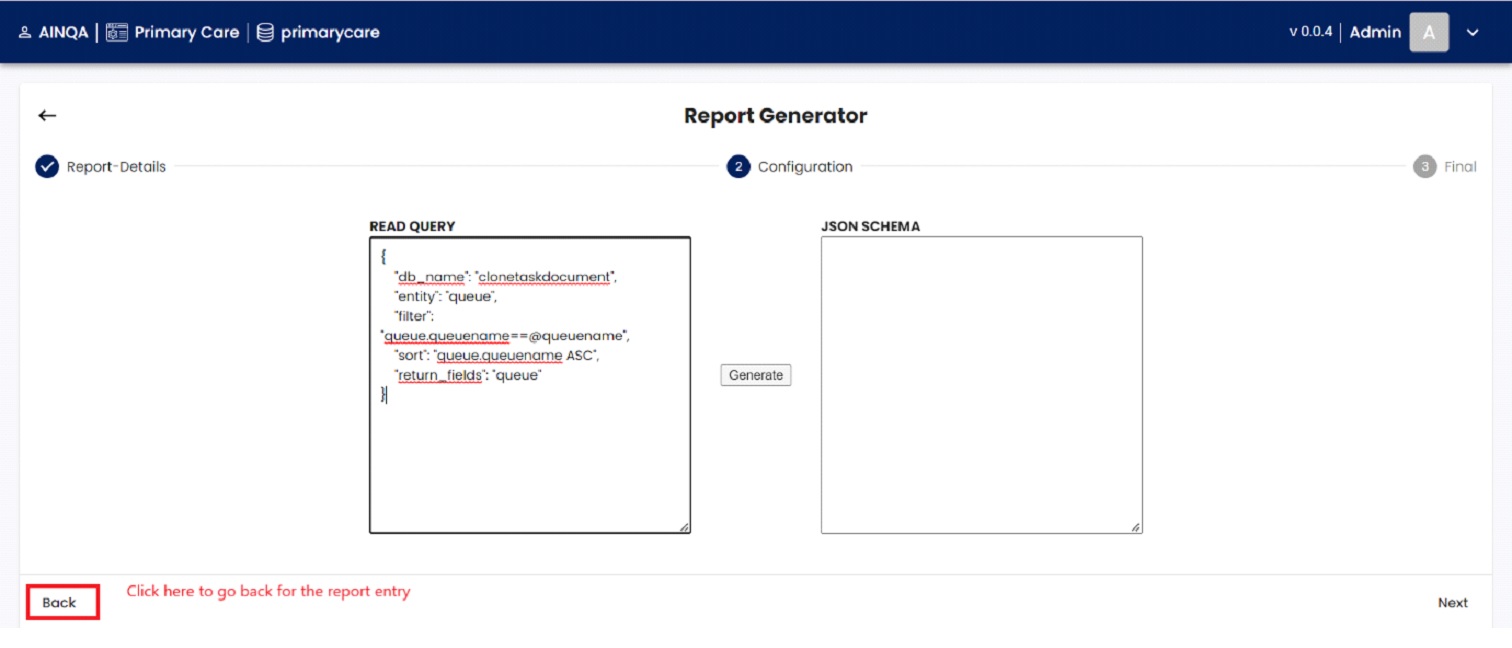
REPORT CONFIGURATION
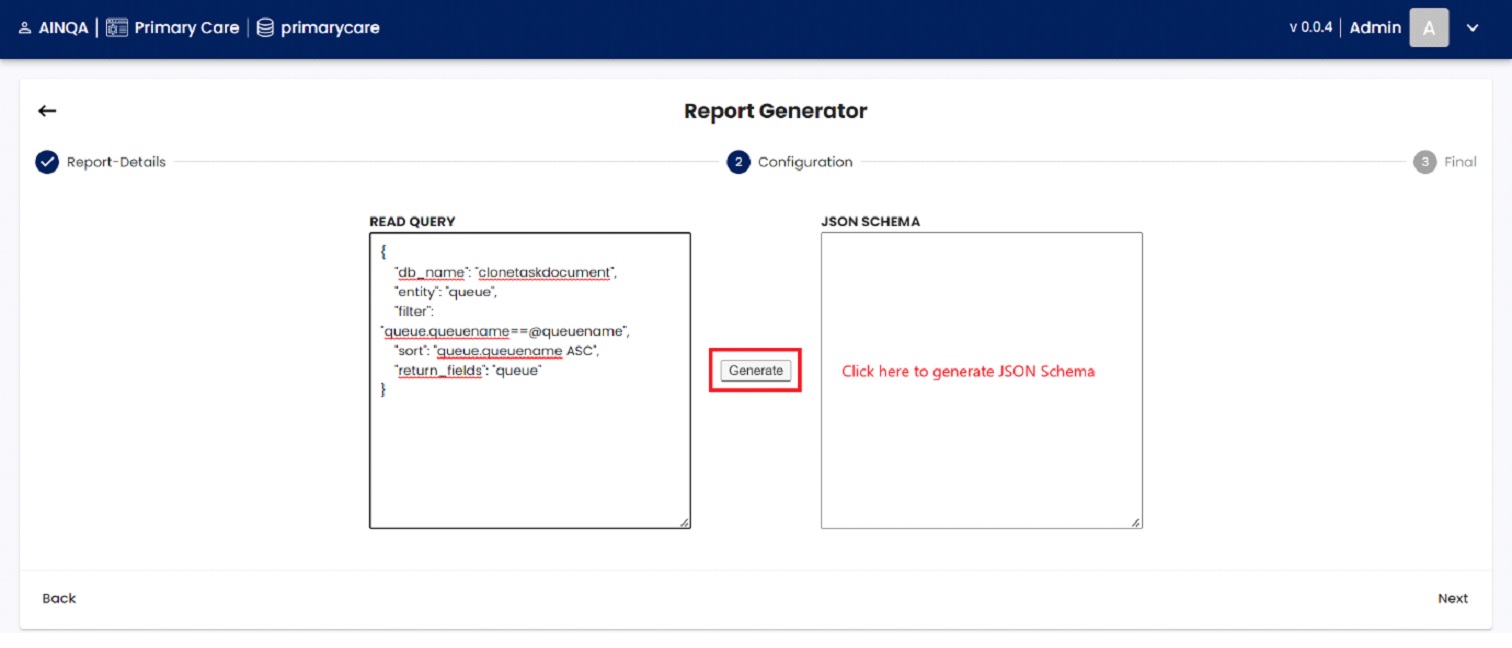
After click on next button, the Screen 5 will be displayed to the user. In this screen, the user can enter the query and generate the schema.
Report configuration includes the following fields:
Read Query – required fields, will be text box which allows user to enter the query for the report.
JSON Schema – required fields, will be text box which allows user to generate the schema by clicking Generate button (Screen 6).
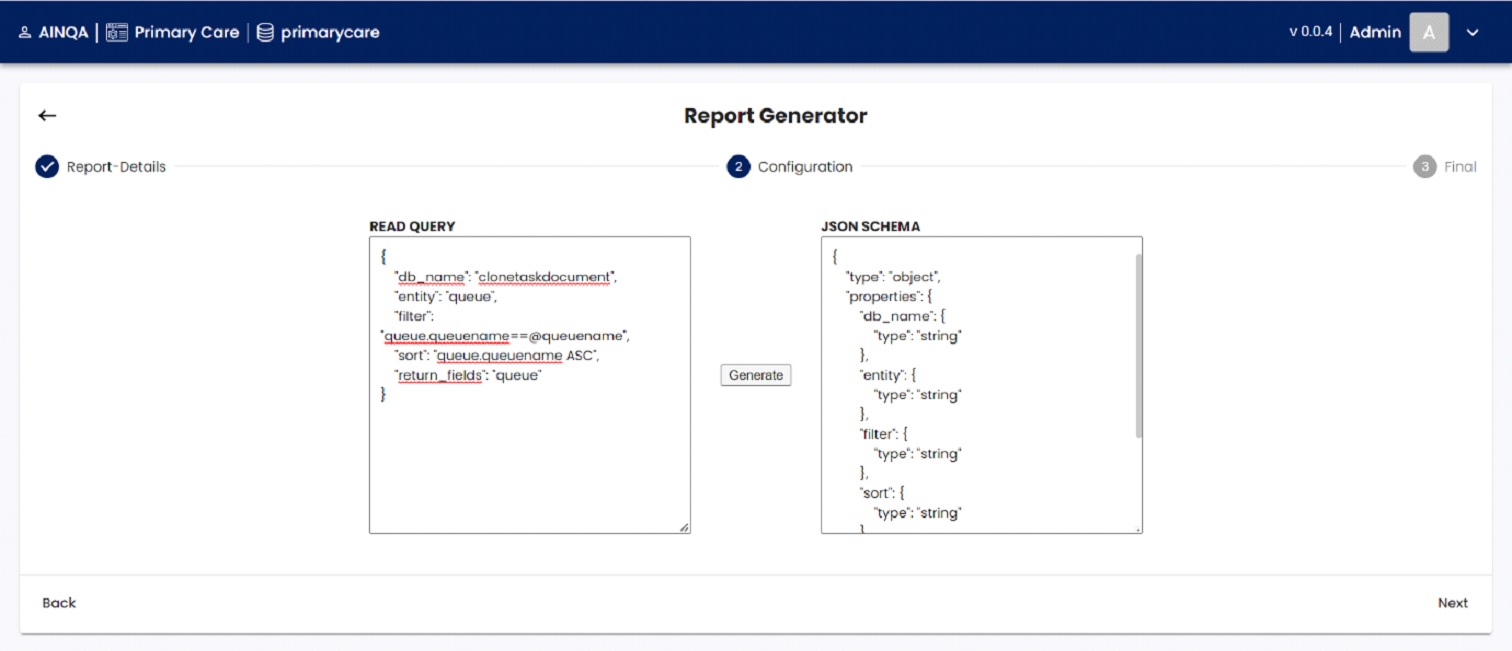
After generating JSON schema Screen 7 will be displayed to the user and then Click next button for Mapping Filter.
Note: If the query does not have any filter variable (“@” variable), then it will go to final step.
MAPPING FILTER
If the user having any filter in their query, then this mapping filter (Screen 8) page will be displayed. In this page the user will be selecting the type for the filter variable.
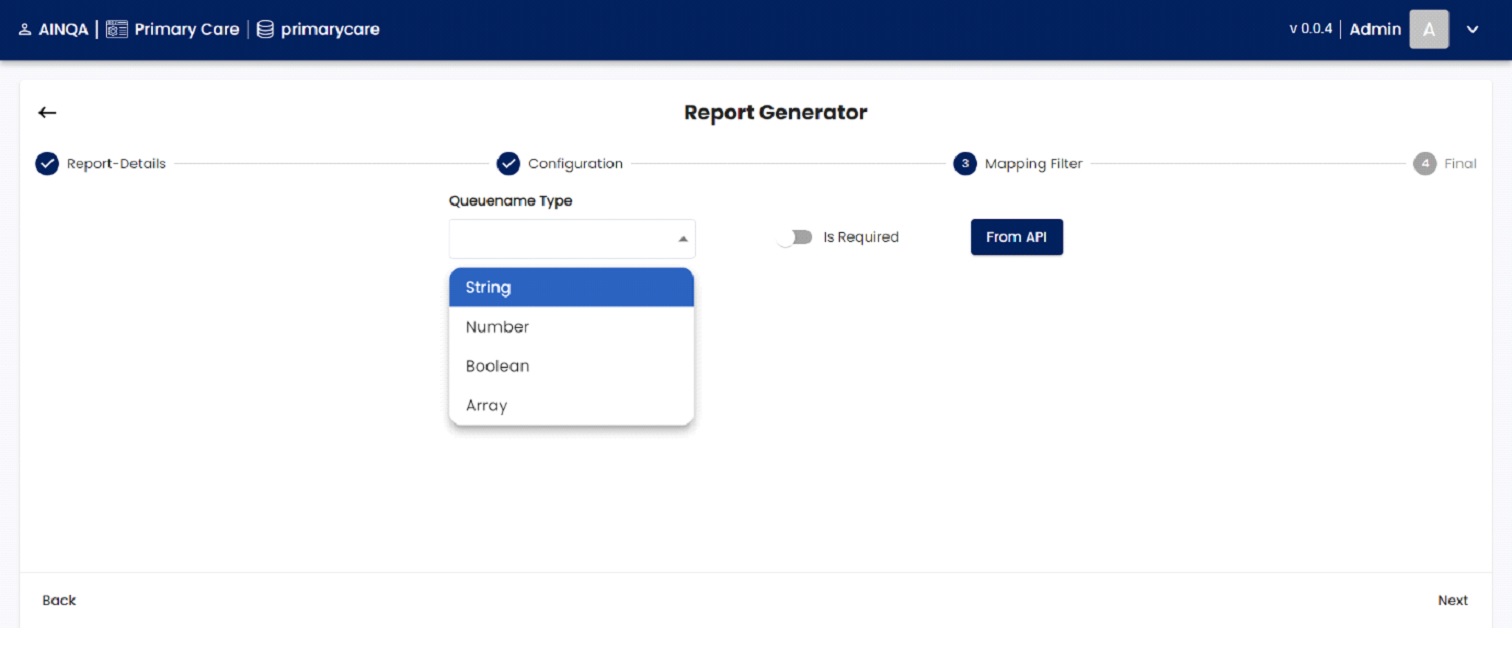
After selecting type, then click on the next button for the final step.
SAVE REPORT
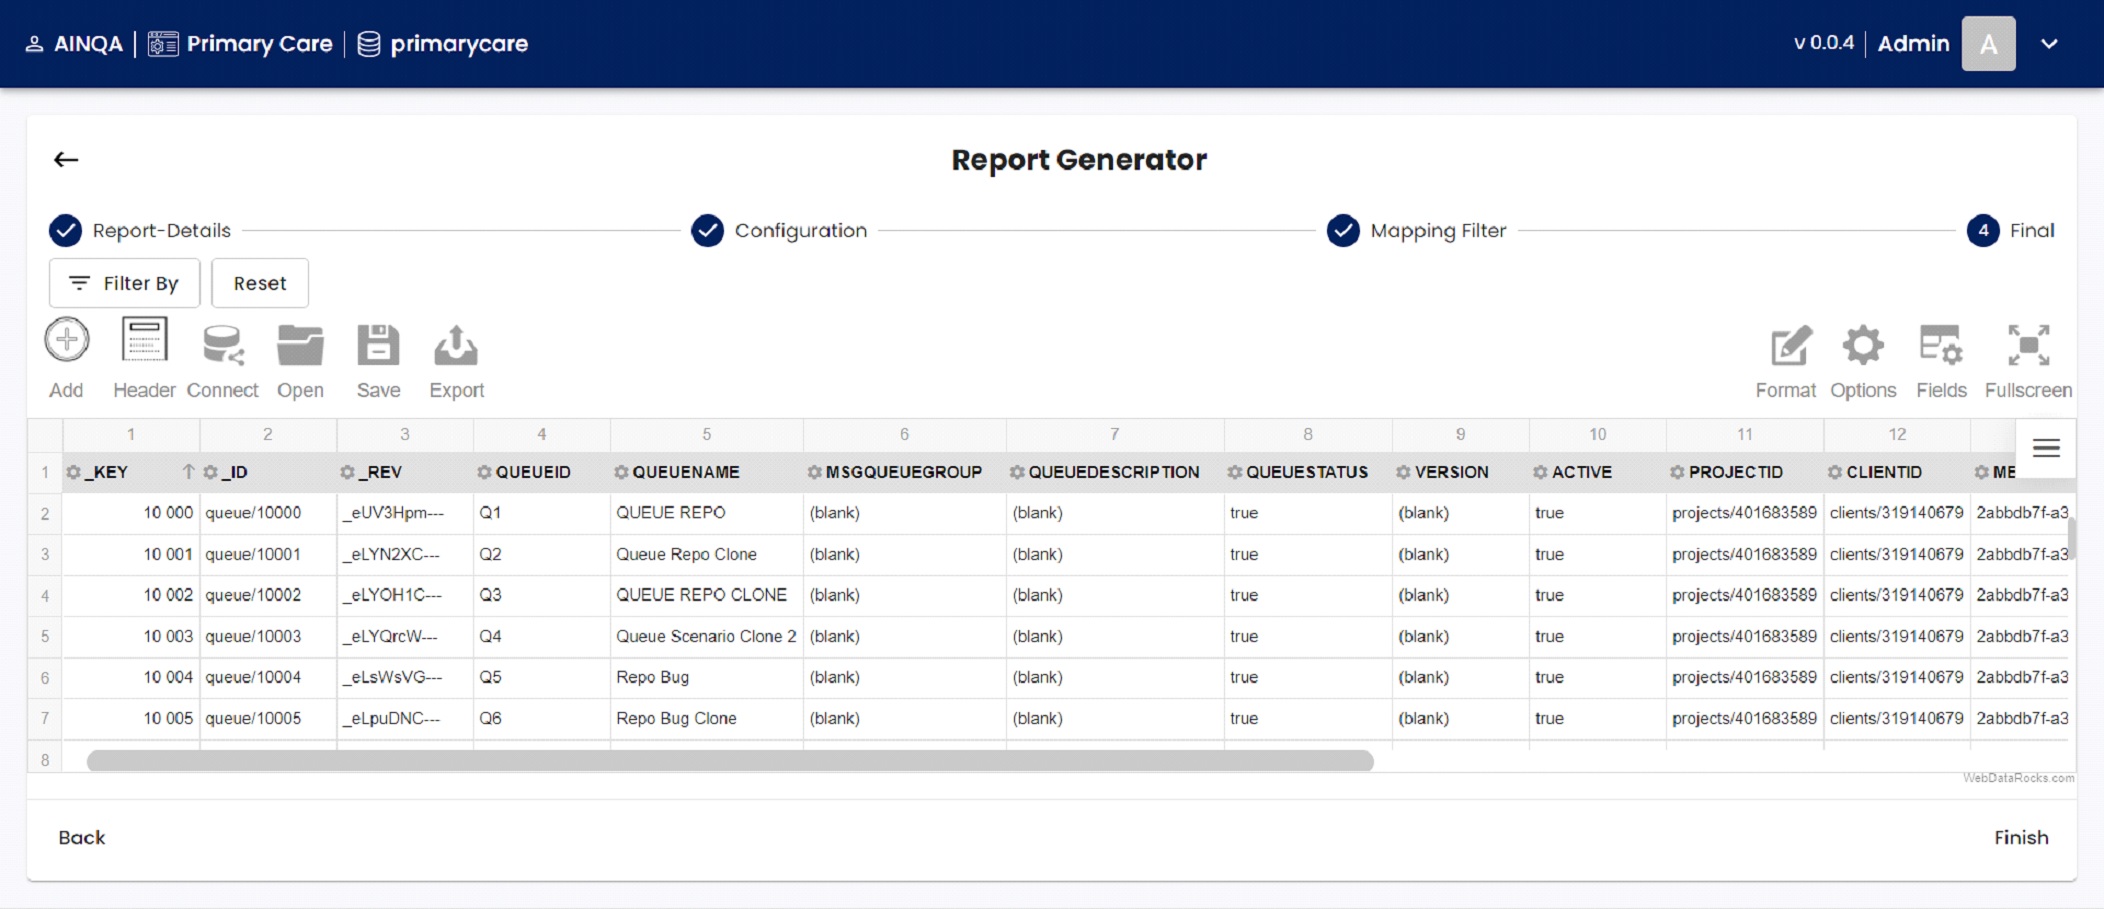
Screen 9 will be displaying the result of the query and then click Finish button which is in bottom right of the screen 9 to the save the report.
VIEW REPORT
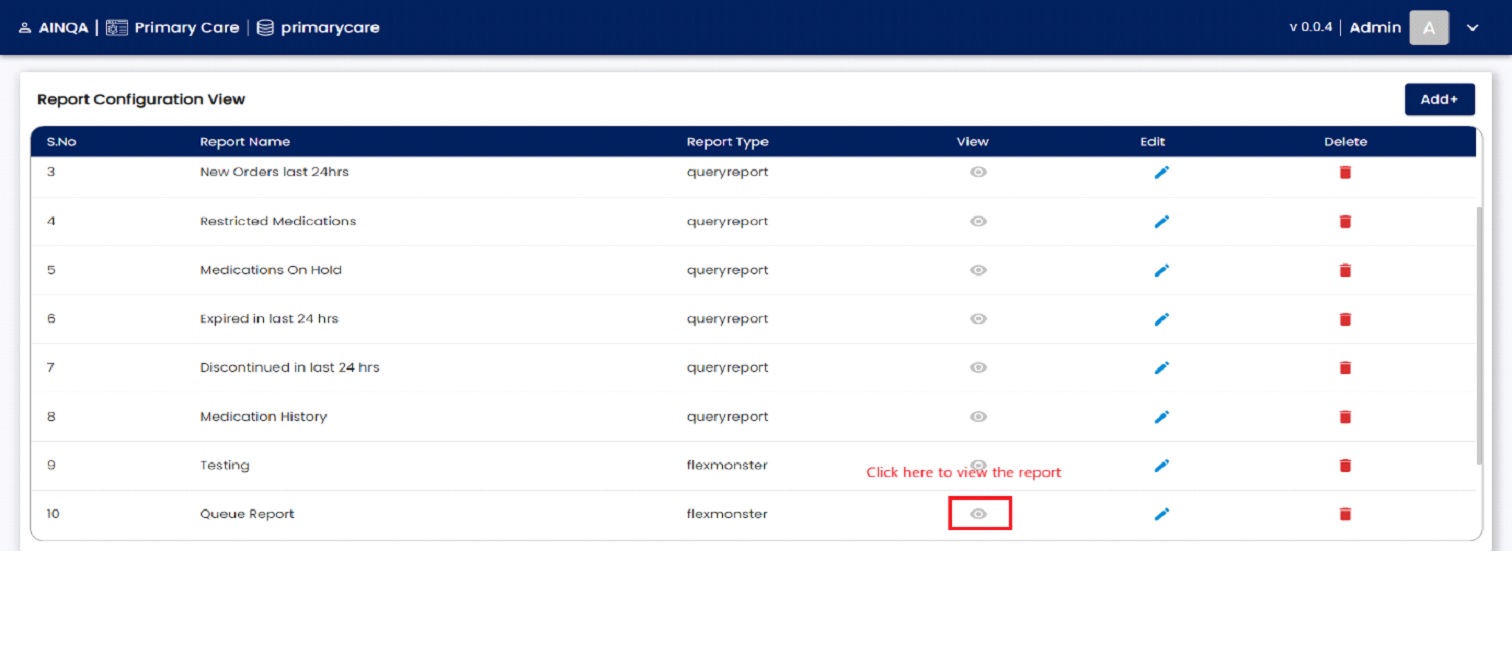
The Screen 10 will be displaying the options for view, edit and delete the report. By clicking on the view button Screen 11 will be displaying to the use
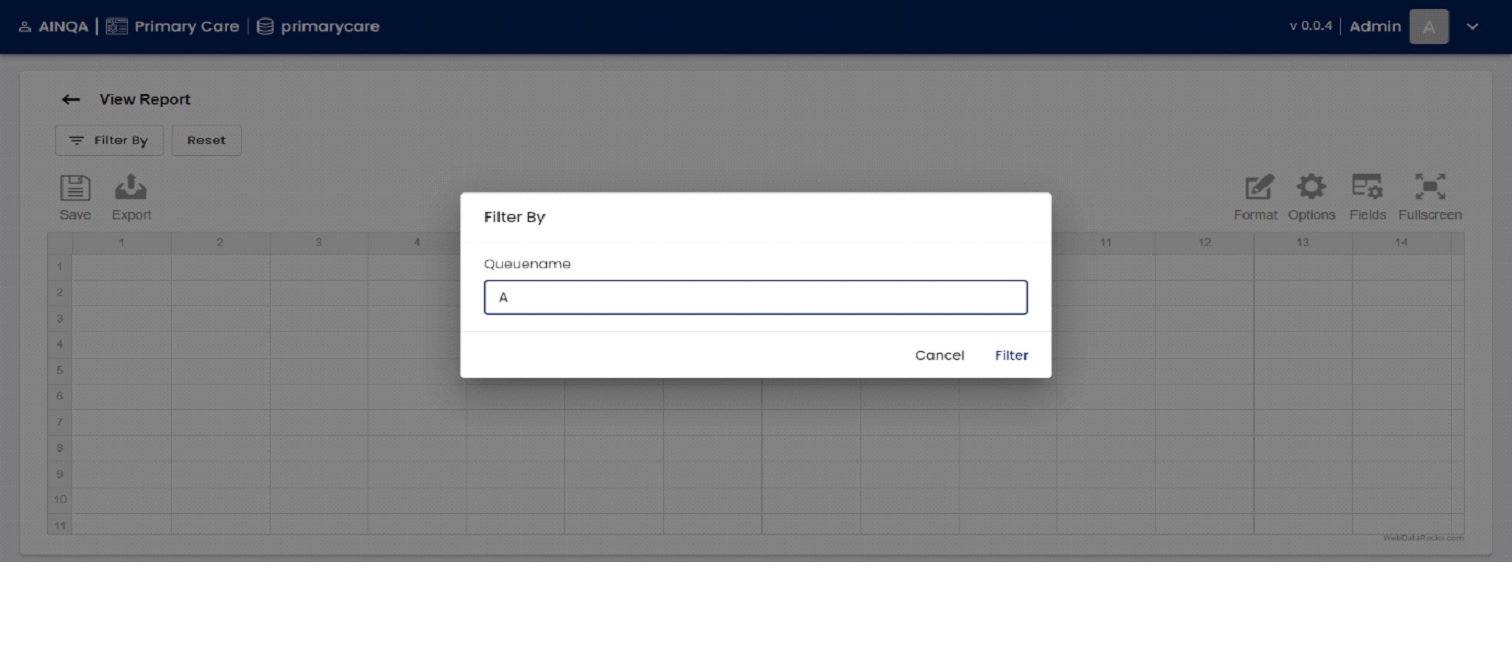
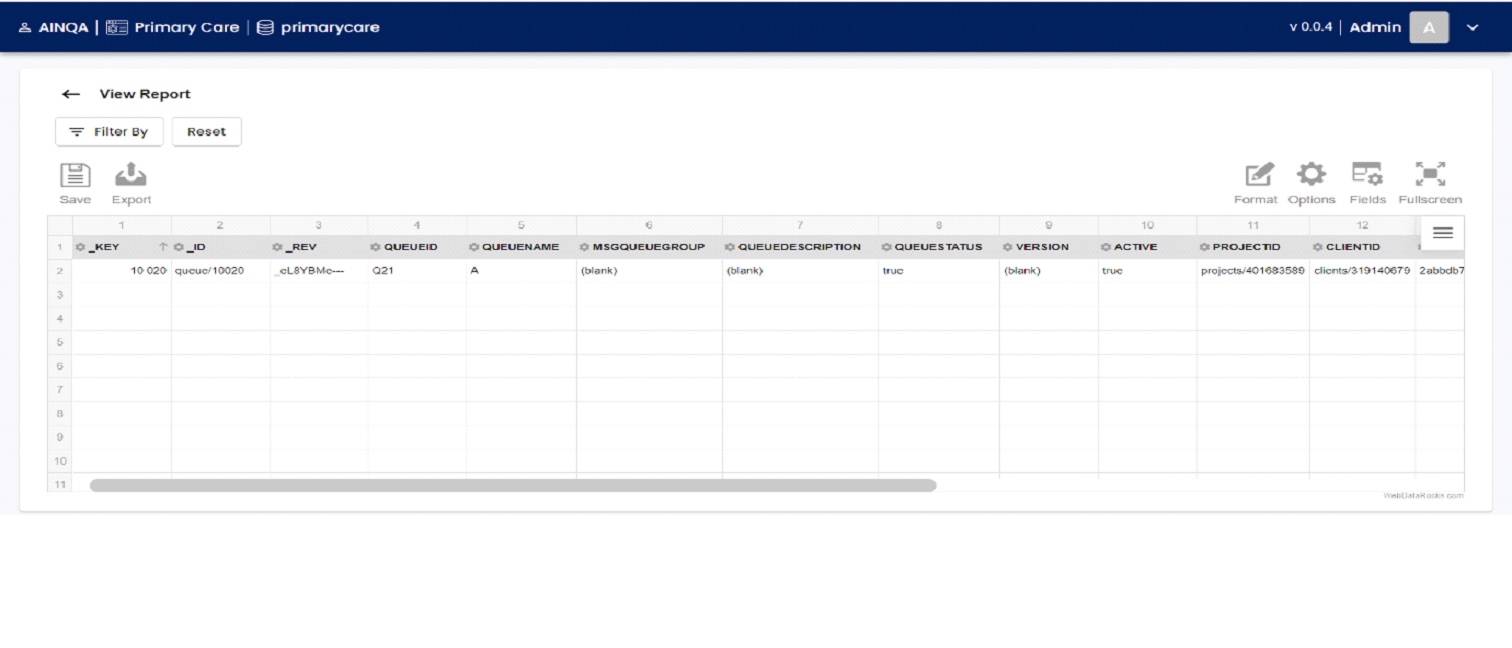
In this screen 11 the user will be entering the filter values, if the query having any filter variable. After entering the value in the textbox and then click filter button to displaying the report. Screen 12 displaying the result of the query
TEMPLATE CHANGE
If user to save the new template from the existing report, the following steps used to create the new template from the existing report:
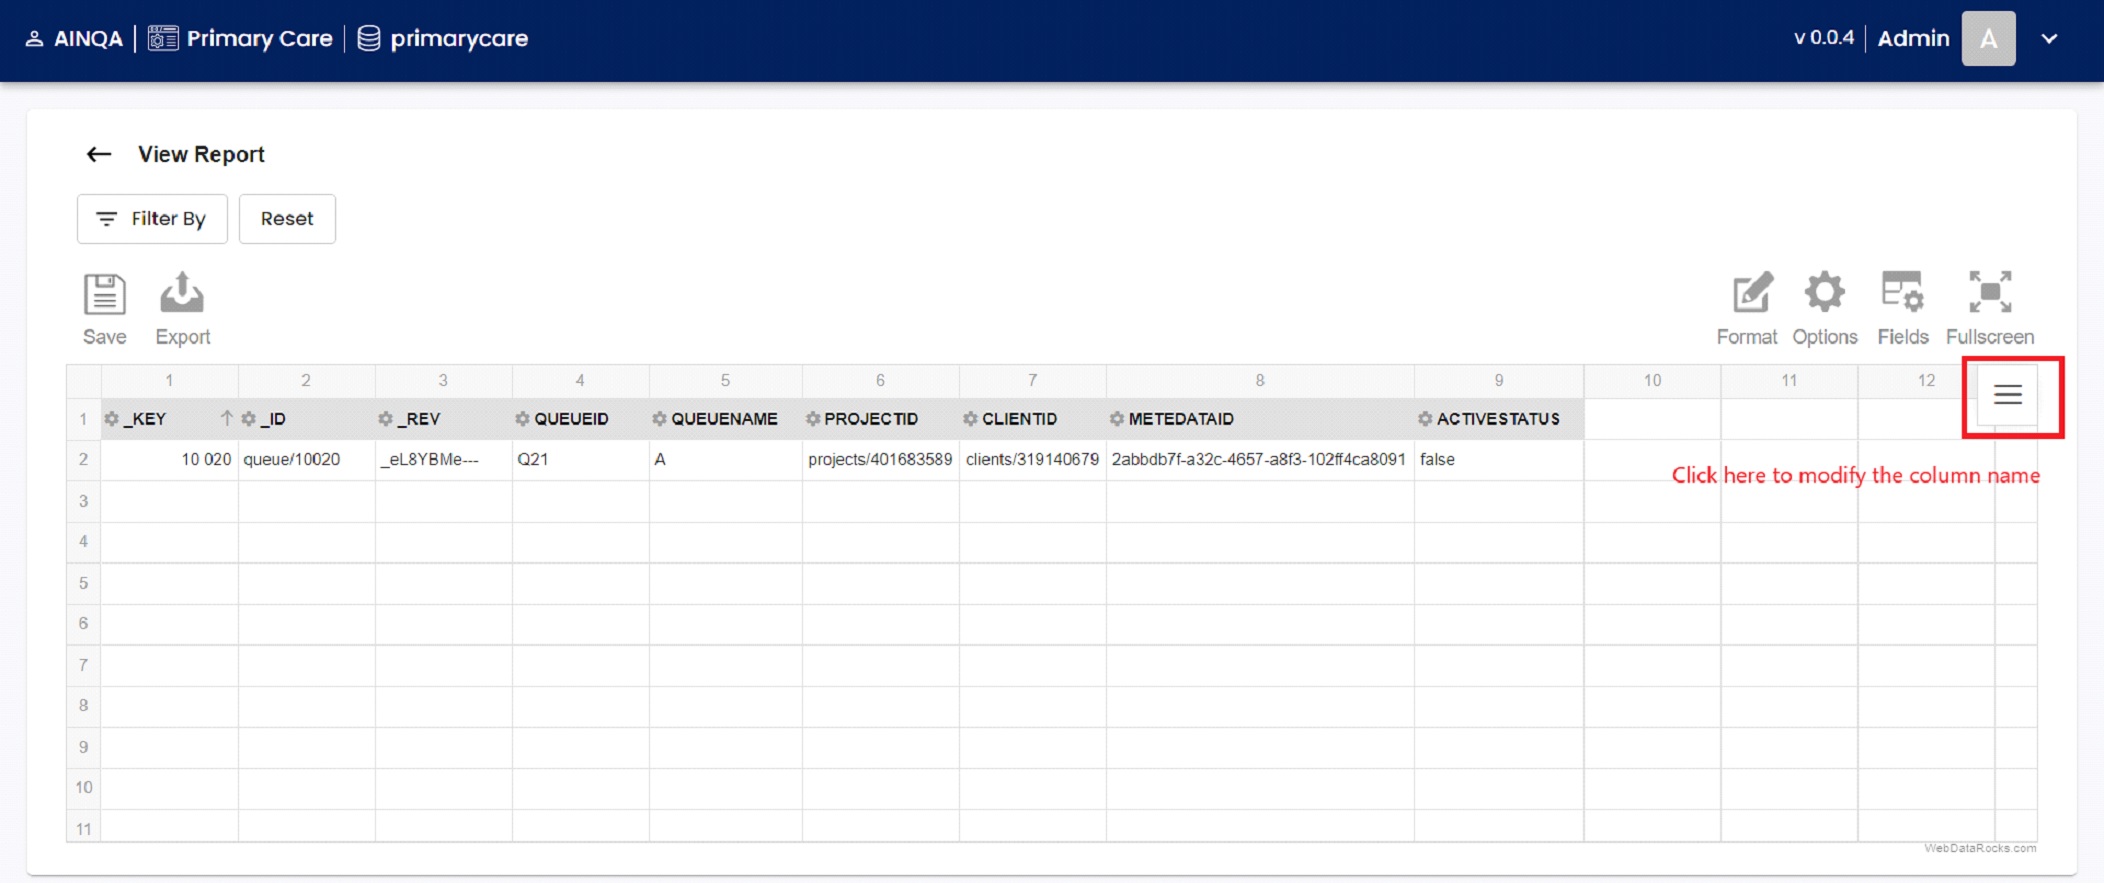
After selecting the report by click on the view button, and then enter the filter values or click on the Reset button. The result will be displaying in the screen 13.
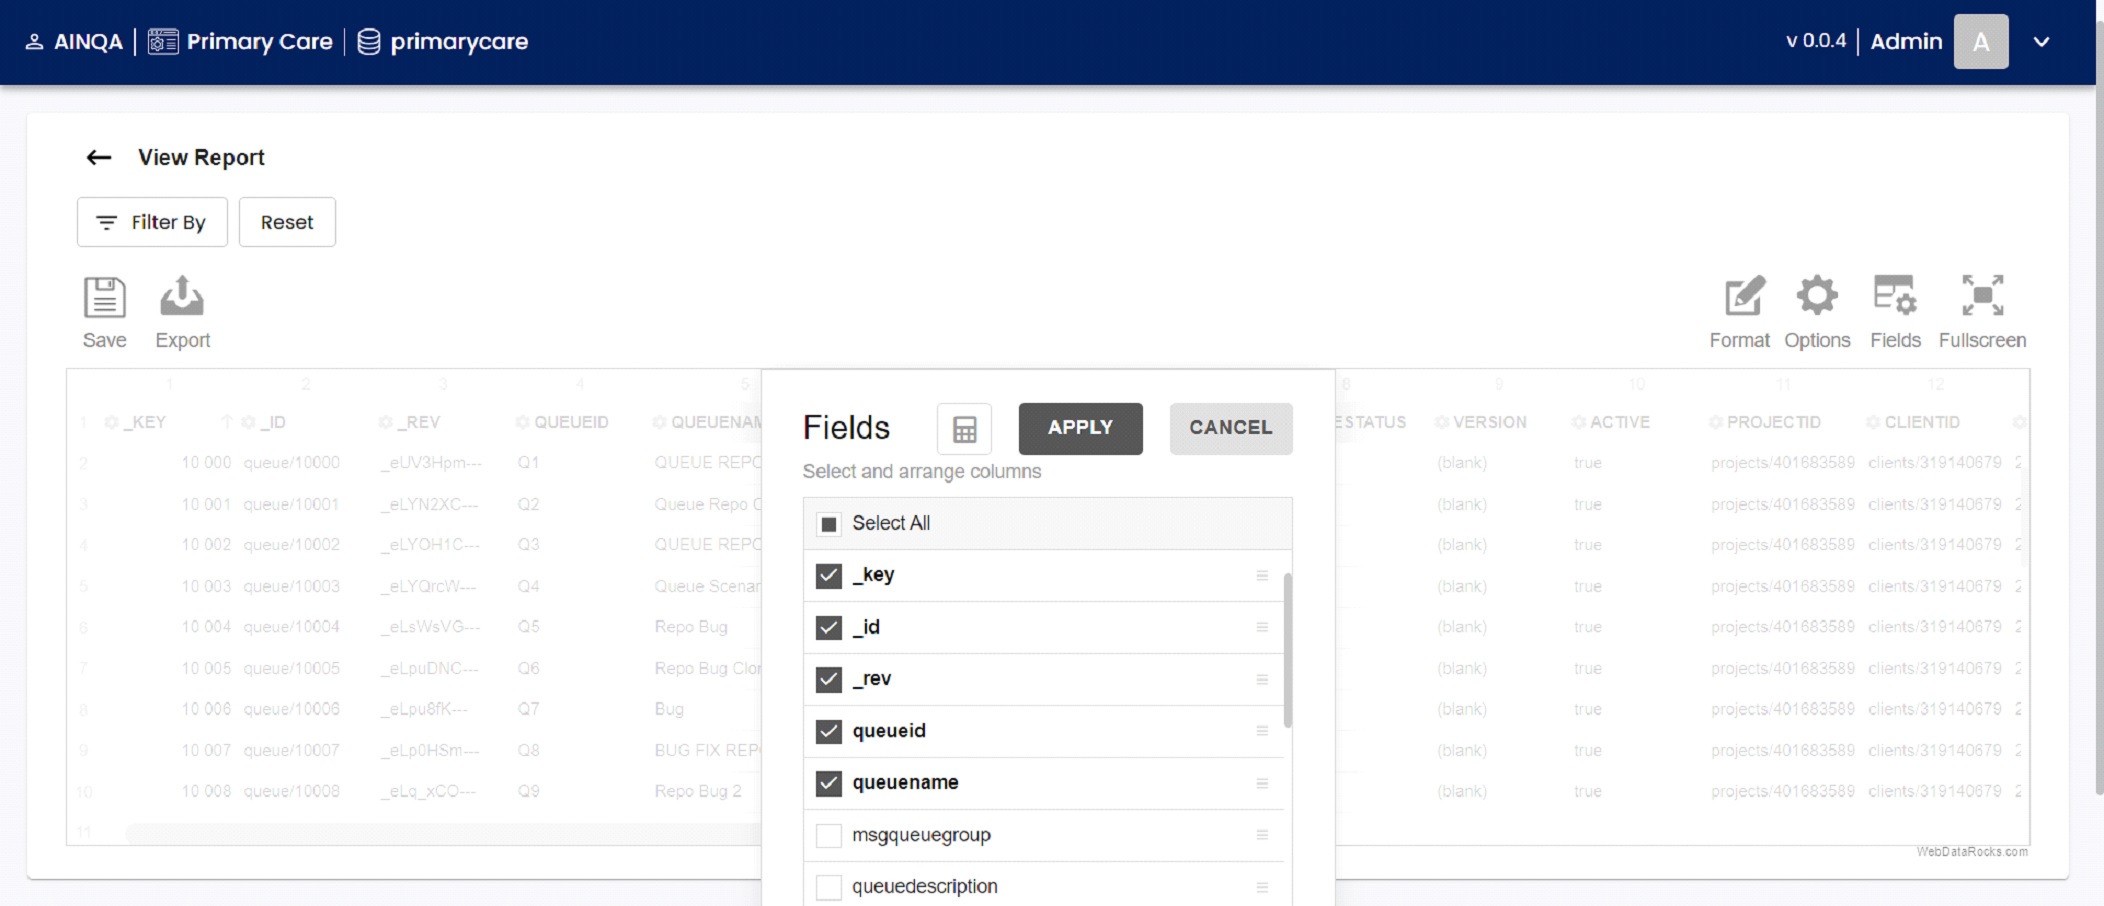
By clicking on the menu button, which is in the top right of the screen 13, the Screen 14 will be displayed to the user
Screen 14 will be displaying the list of the field name; the user can select their field which they want and then click Apply button.
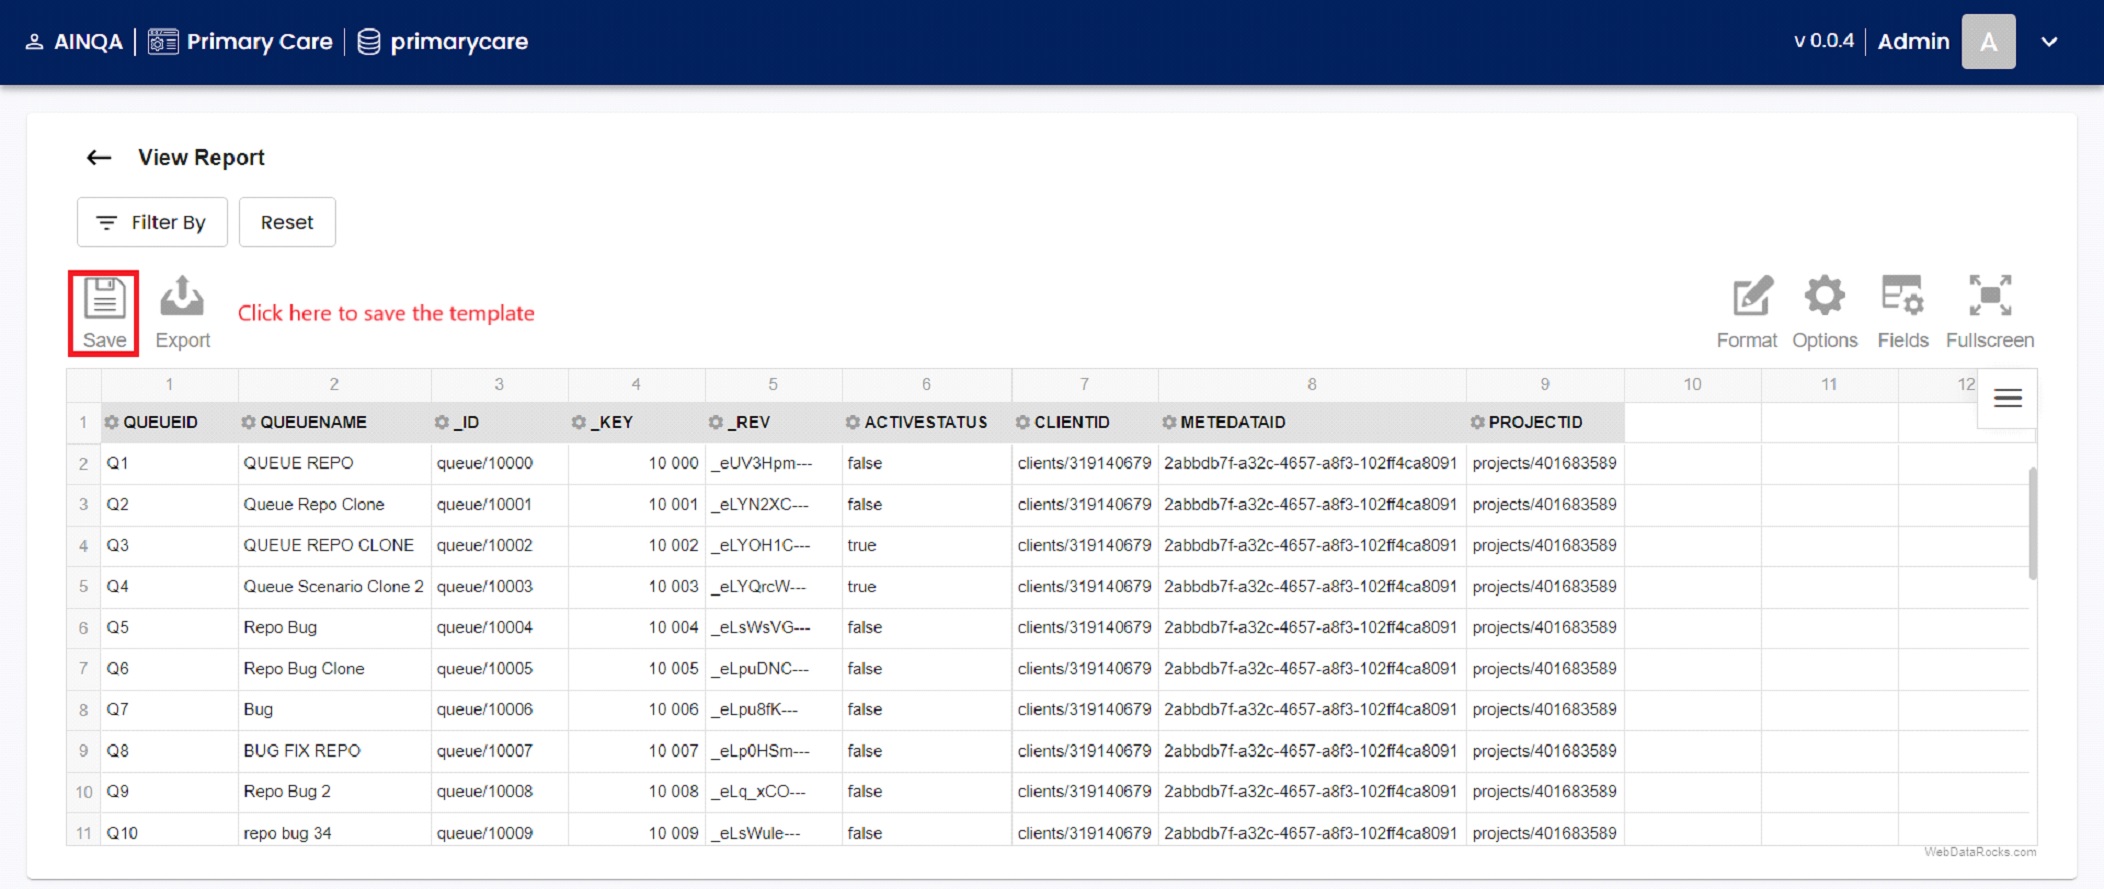
The Screen 15 will be displayed to the user after click on the Apply button. This screen displaying the report of the query with changed template.
If user want to save this template, by click on the top left save button of the screen 15
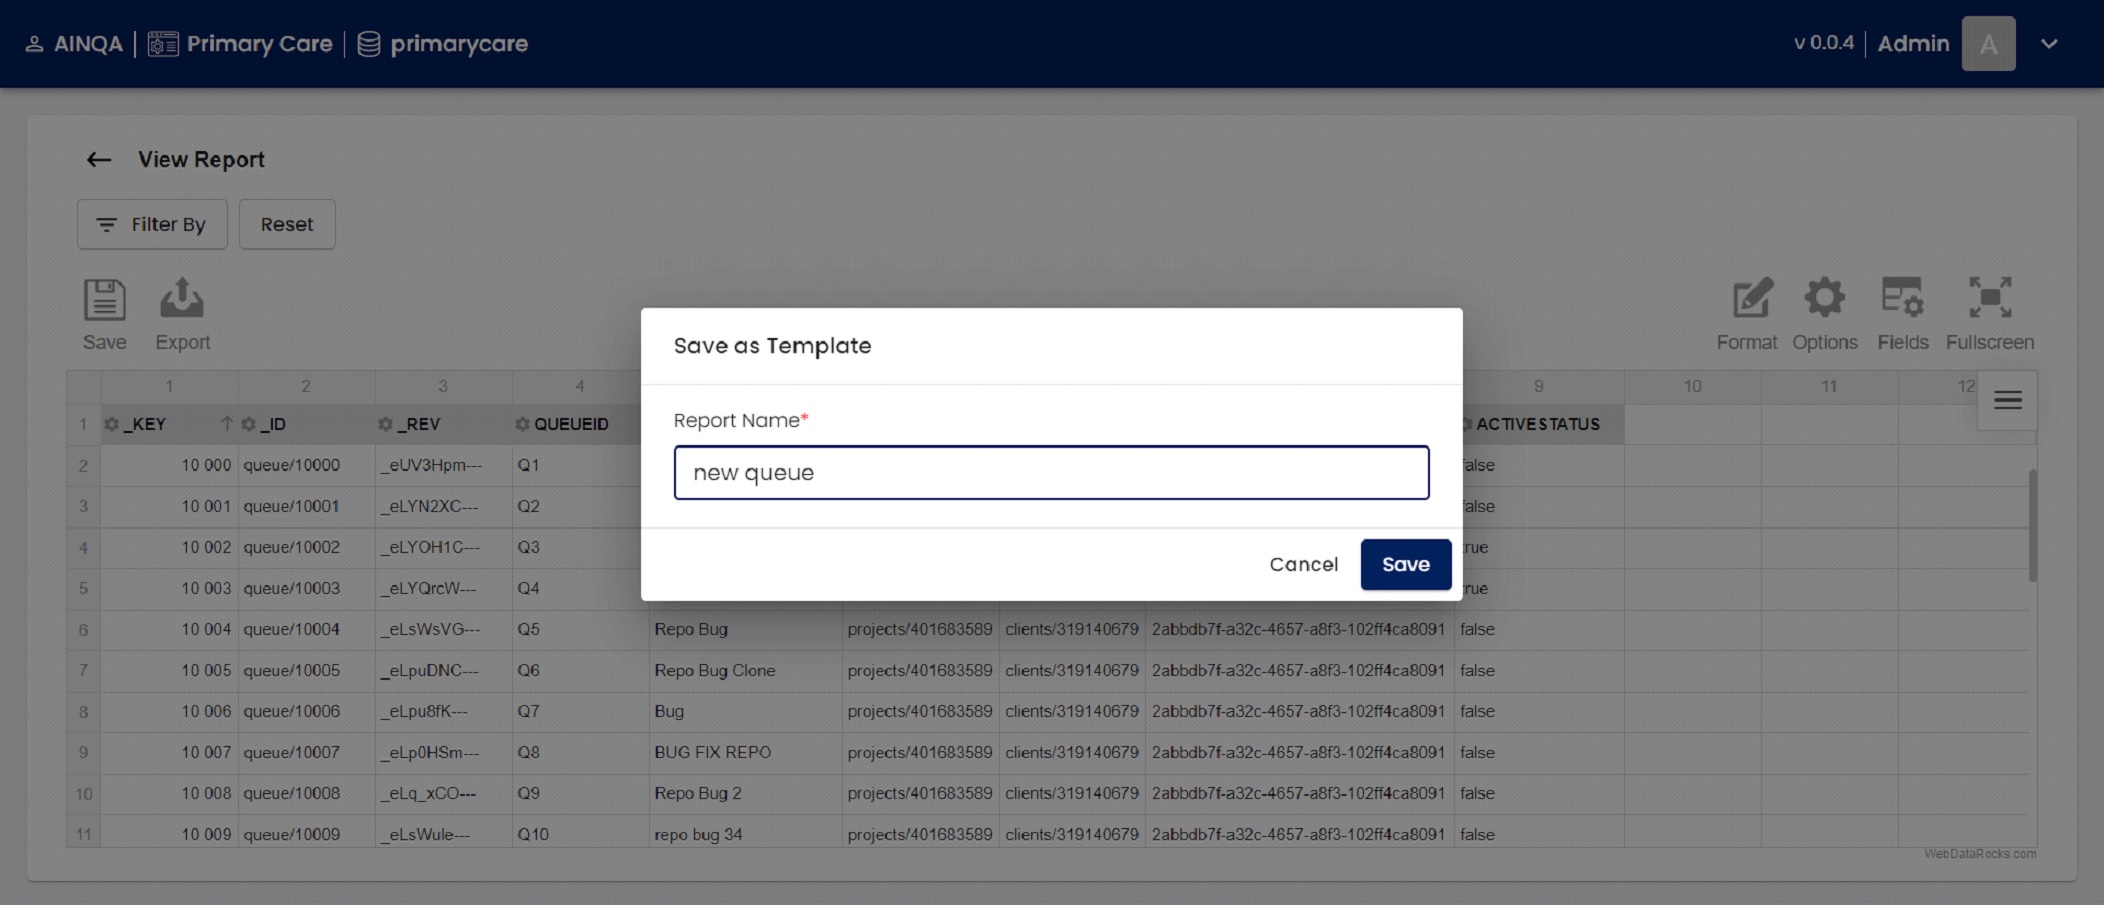
Then the screen 16 will be displayed to the user. In this screen, the user enters the name of the report and click save button to save the template.
pivot
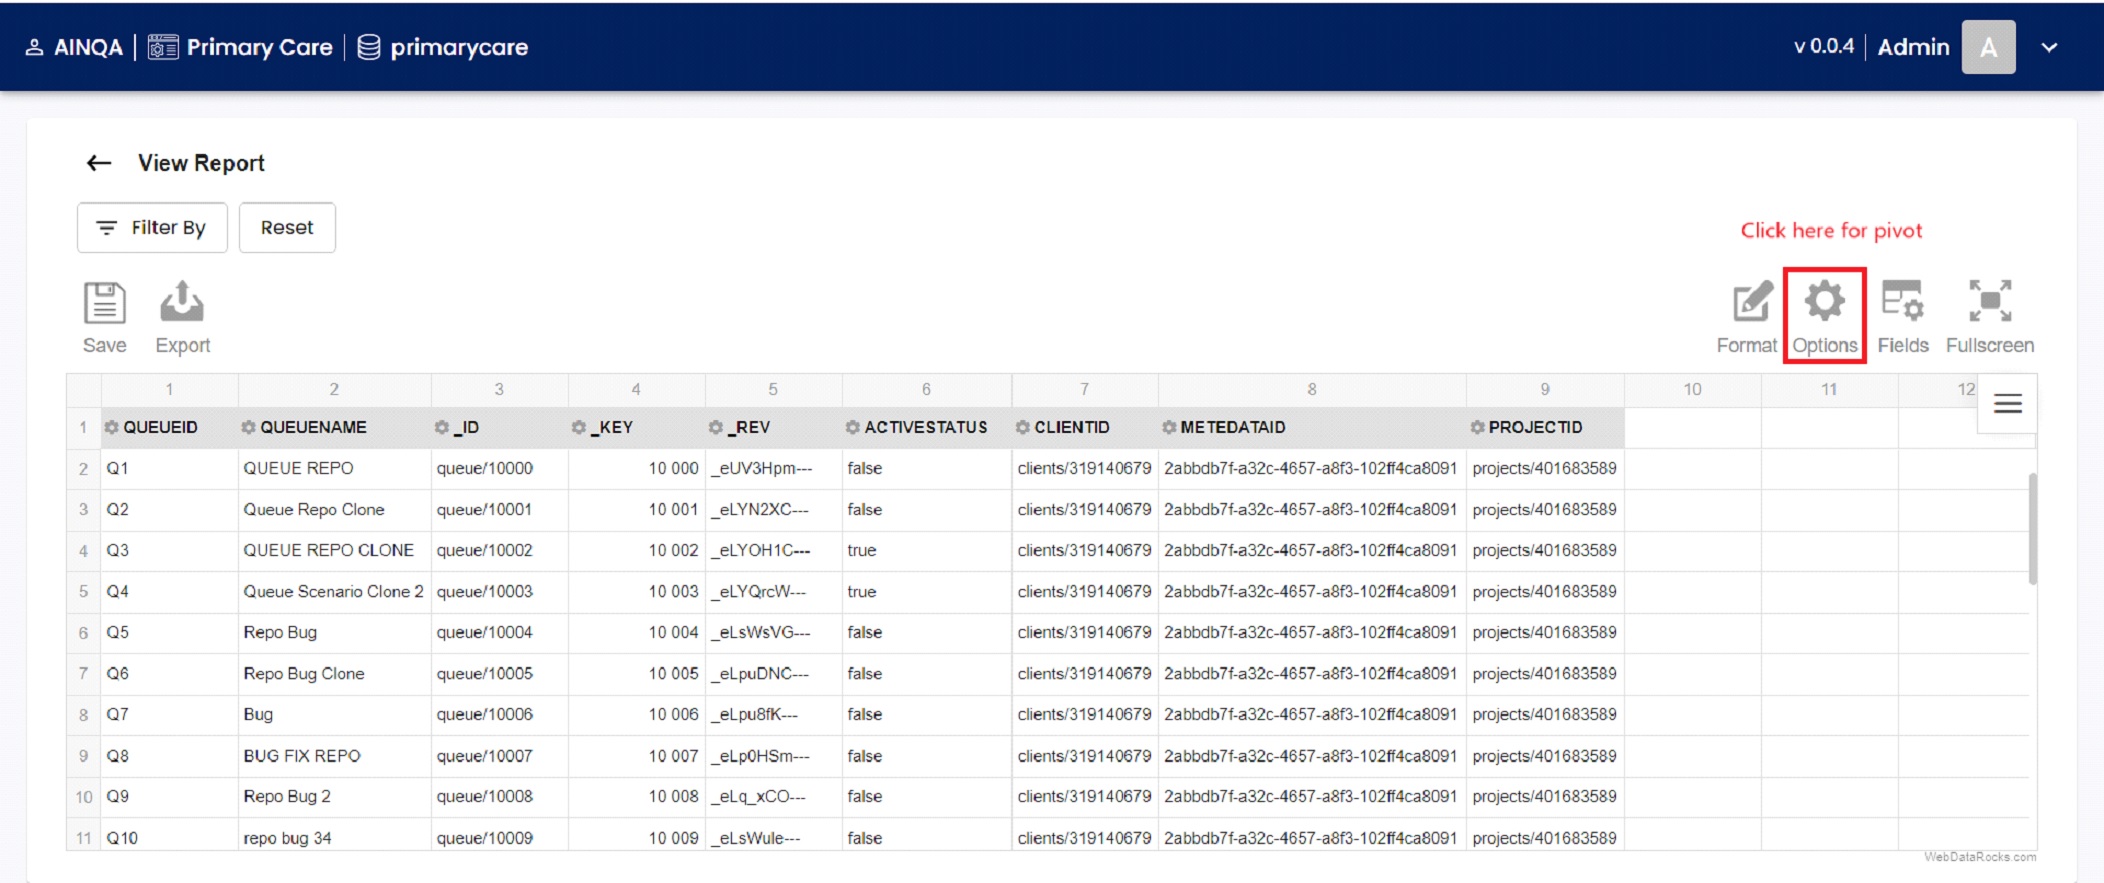
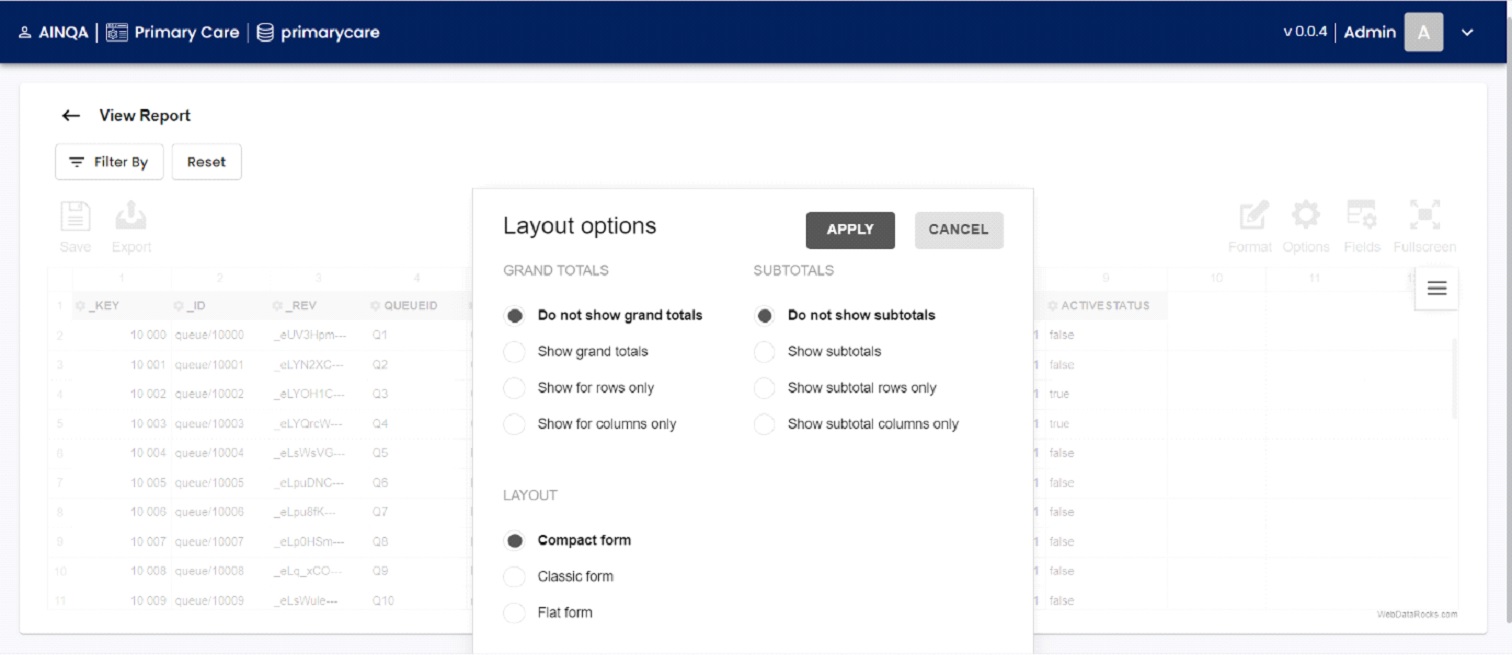
If user want to do the pivot for existing report means, then user click on the options button on the top right of the screen 17
After click on the option, screen 18 will be displayed to user. Here the user can be able to change the layout of the report. For Pivot, select Compact Form from Layout.
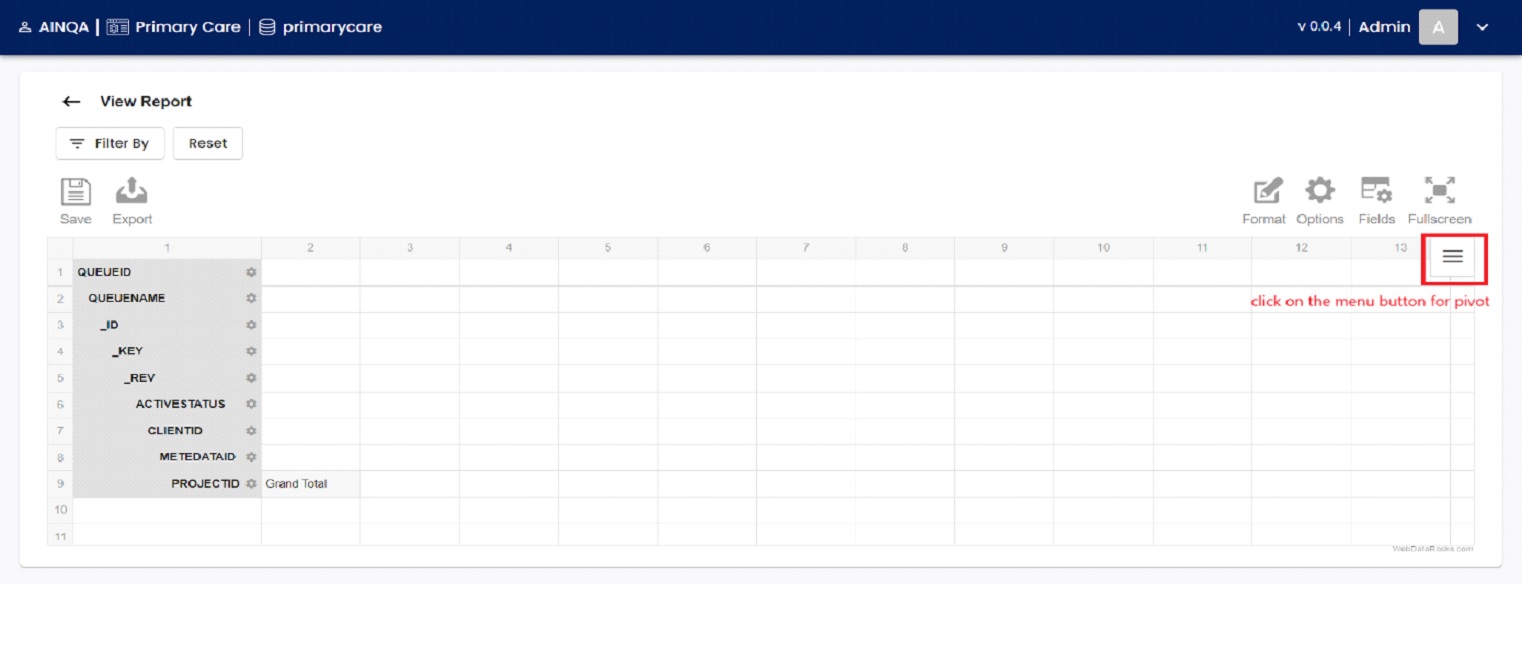
After select layout, screen 19 will be displayed to the user and then click on the menu button from Screen 19
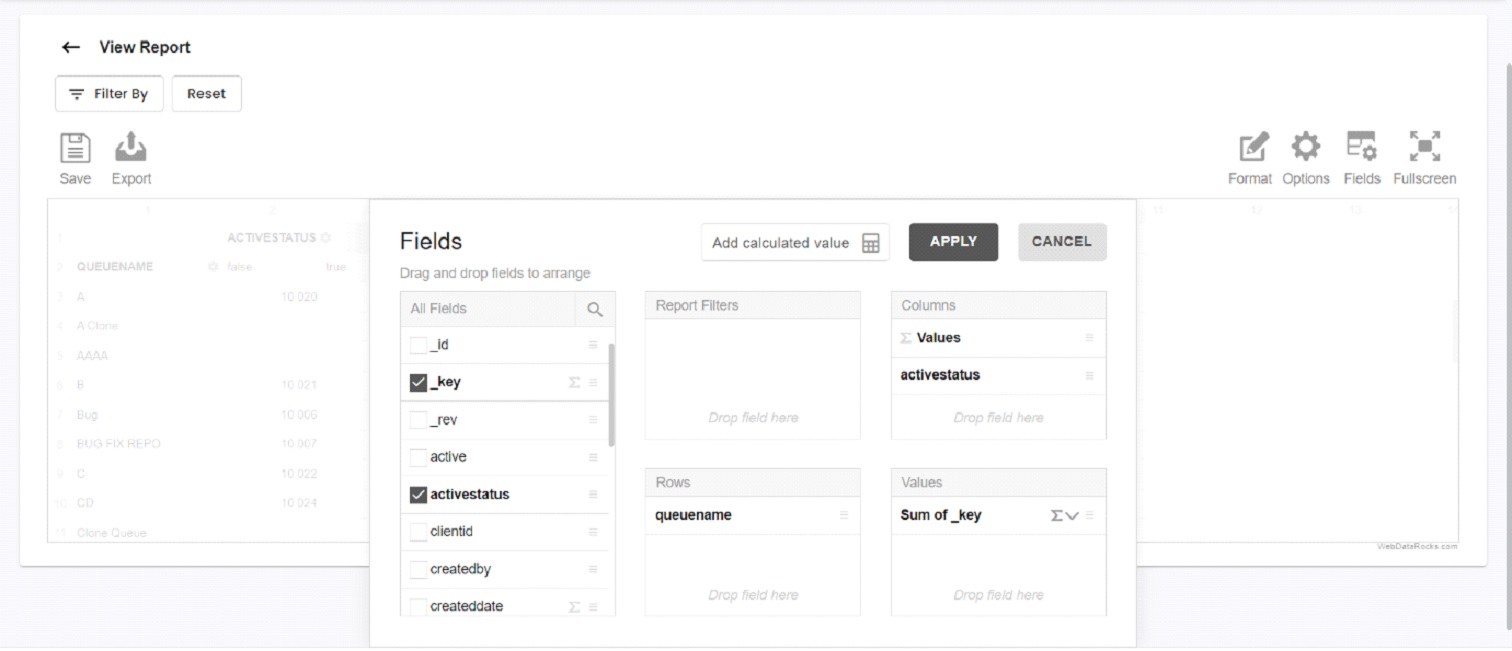
After click on menu button, the screen 20 will be displayed to the user. In this screen, the user can be able to change the condition for pivot. For this scenario, here queuename is selected in Rows and activestatus is selected for column and _key is selected for values. After selecting the values for pivot and then click Apply button.
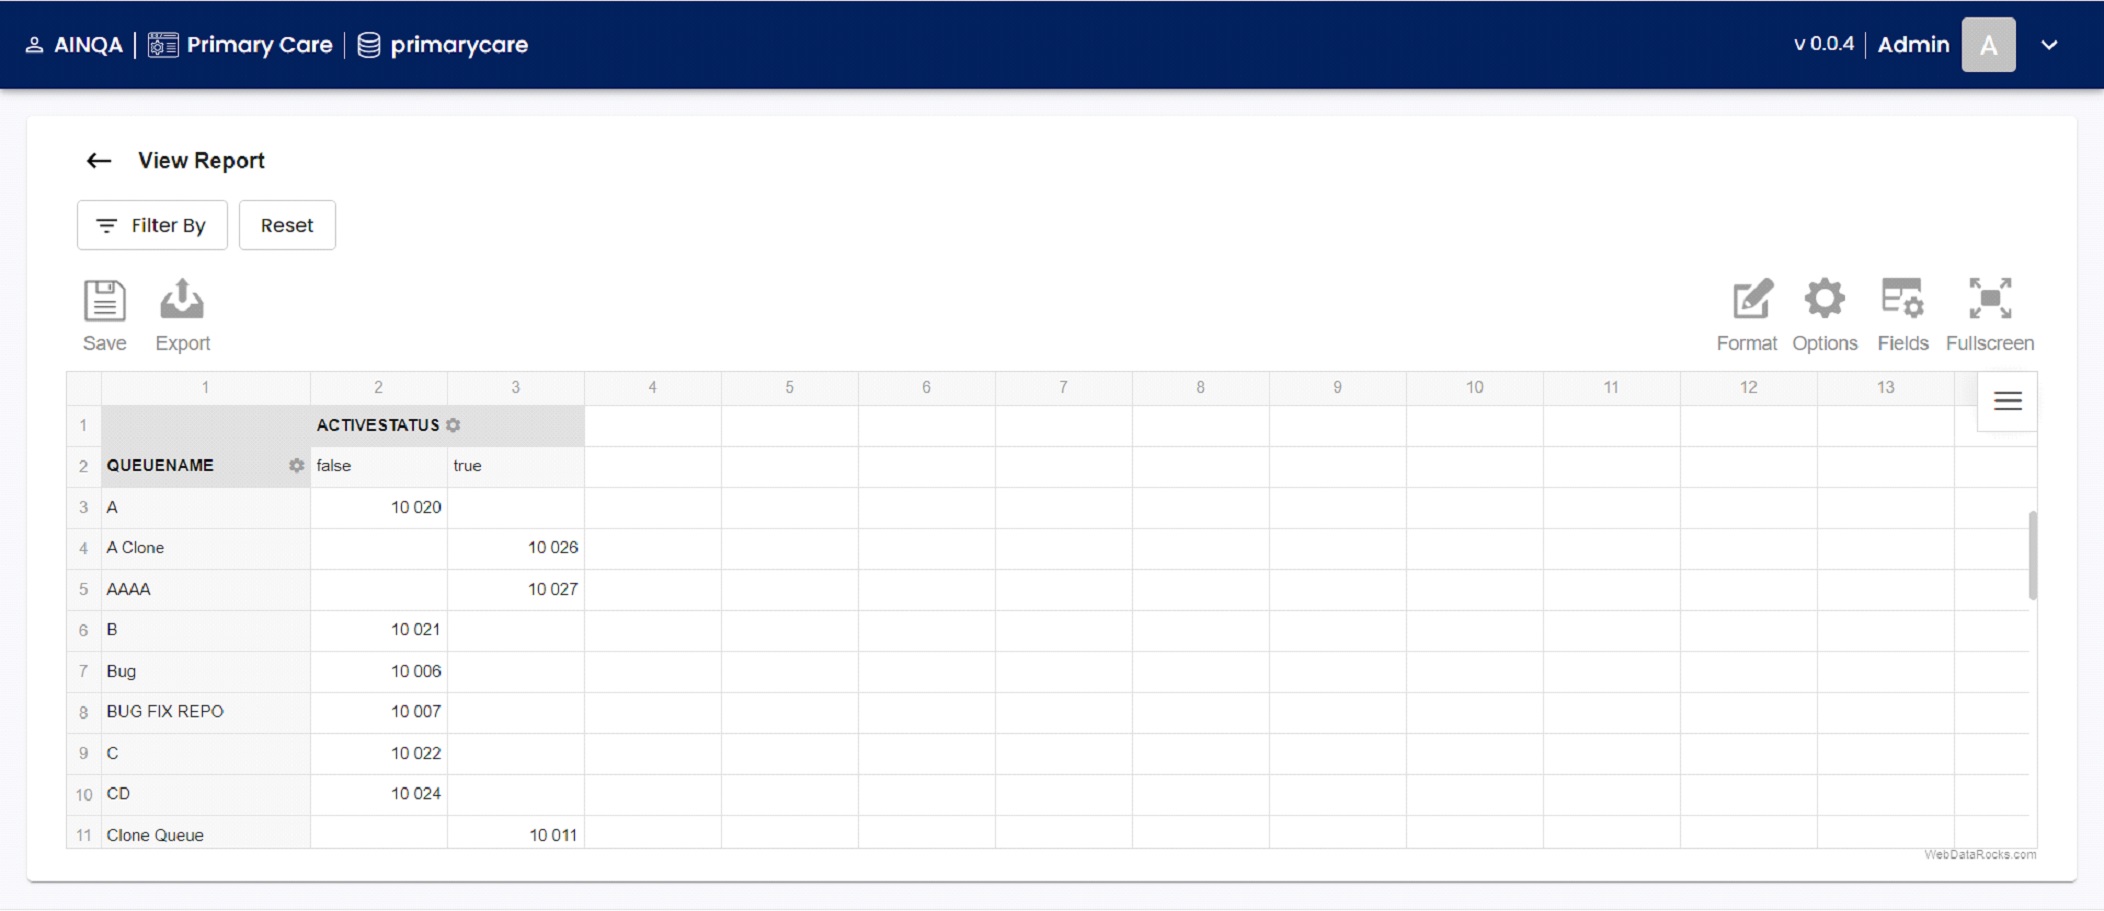
After click on Apply button, the screen 21 will be displayed to the user. In this screen shows the report of the pivot. Here activestatus in column and queuename is in row and _key value is displayed in activestatus column if it is true or false.
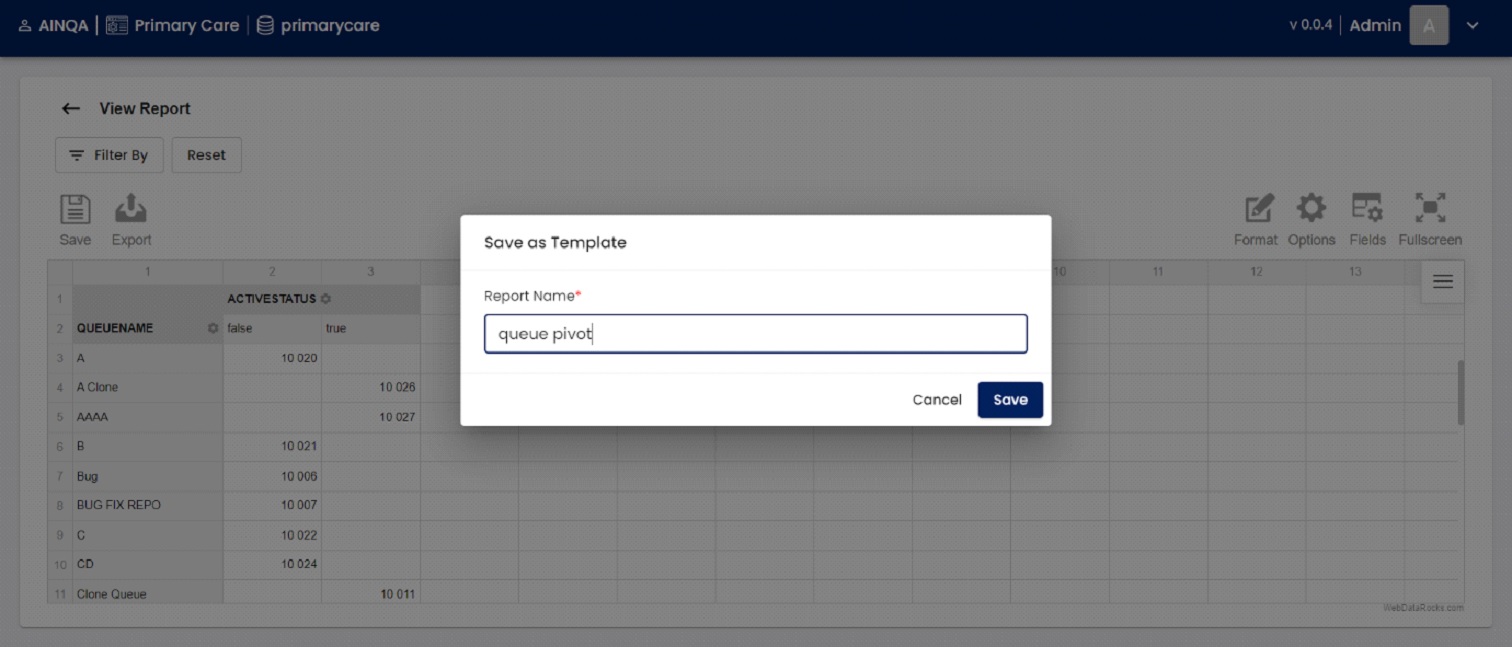
After pivot, if user want to save this layout means then click on the save button and then screen 22 will be displayed to the user. In this screen the user can be able to enter the name of the report and click save button.
NuGet URL : https://www.nuget.org/packages/QDMLog4Net/
Package Name : QDMLog4Net
Version : 1.2.0
Namespace : QDMLogger
Class Name : Logger
Methods :
Initialize
INIT (USER_ID, APPLICATION_NAME, ARANGO_SERVICE_URL, DB_NAME, LOGGER_LEVEL_COLLECTIONS_NAME, EVENT_CATALOG_COLLECTION_NAME, LOGGING_NIFI_URL)
For Application Logging
TRACE (LOG_MESSAGE)
INFO (LOG_MESSAGE)
WARN (LOG_MESSAGE)
DEBUG (LOG_MESSAGE)
ERROR (LOG_MESSAGE)
FATAL (LOG_MESSAGE)
For Event Logging
EVENT (EVENT_CODE, EVENT_DATA)
For Event Logging
EVENT (ERROR_CODE, ERROR_DATA)
INSTALLATION
Install-Package QDMLog4Net -Version 1.2.0
USAGE
using QDMLogger;

Logger logger = new Logger();

// Initialize

logger.Init("PXS0362", "clmm", "http://164.52.210.54:8080", "ATP_Metadata_Dev", "Logger_Config", "http://101.53.136.60:9999/api/logging");

// Call log methods

logger.Trace("This is trace");

logger.Debug("This is debug");

logger.Info("This is info");

logger.Warn("This is warn");

logger.Error("This is error");

logger.Fatal("This is fatal");
const string AddPharmacyLocation = "ADD_PH_LOCN";

string eventData = "{ \"PharmacyLocation\":\"Chennai\",\"Pincode\":\"101010\" }";

string errorData = "{ \"ErrorData\":\"Service Error}";
// Event Logging

logger.Event(AddPharmacyLocation, eventData)
// Error Logging

logger.Event("404", errorData)
APPLICATION CONFIGURATION
APPSETTINGS.JSON FILE
{

    "LoggerConfig": {

        "arangoServiceUrl": "http://164.52.210.54:8080",

        "arangoDBName": "ATP_Metadata_Dev",

        "arangoCollectionName": "Logger_Config",

  "eventCollectionName": "clmm_event_catalog",

        "loggerNIFIUrl": "http://101.53.136.60:9999/api/logging"

    }

}
ARANGO DB DETAILS
DB Name : ATP_Metadata_Dev
Logger Collection Name : Logger_Config
Event Collection Name : clmm_event_catalog
LOG OUTPUT
APPLICATION LOG
{

    "TimeStamp": "2022-06-20T00:00:00+05:30",

    "LogType": "Application",

    "ApplicationName": "clmm",

    "UserID": "pxs0362",

    "LogLevel": "FATAL",

    "FunctionName": "Main",

    "FilePath": "C:\\Users\\PanneerSelvam\\MY FOLDERS\\MY PROJECTS\\qdm-log4net\\TestApp\\Program.cs",

    "LineNumber": 17,

    "LogMessage": "This is new fatal"

}
EVENT LOG
{

    "TimeStamp": "2022-06-20T00:00:00+05:30",

    "LogType": "Event",

    "ApplicationName": "clmm",

    "UserID": "pxs0362",

    "EventCode": "ADD_PH_LOCN",

    "EventName": "Add Pharmacy Location",

    "EventFunctionGroup": "Pharmacy",

    "EventScreen": "Pharmacy",

    "EventData": "{ \"PharmacyLocation\":\"Chennai\",\"Pincode\":\"101010\" }"

}
ERROR LOG
{

    "TimeStamp": "2022-06-20T00:00:00+05:30",

    "LogType": "Event",

    "ApplicationName": "clmm",

    "UserID": "pxs0362",

    "EventCode": "404”,

    "ErrorMessage": "Service URL not recognized",

    "ErrorDescription": "Server cannot find the requested resources"

}